Create audiobooks from text with OpenAI and Java

Introduction
For many people, audiobooks are a staple of daily life. Spoken content helps people pass time, learn new things, and stay entertained without tying themselves to a screen or a book. Imagine turning your daily commute, workout sessions, or household chores into opportunities to catch up on all your reading -- not just books. You can grab text from emails, from the web, or even that report you need to "read" for work. With the rise of advanced text-to-speech (TTS) technology, it's not just possible, it's quick to build in Java with simple APIs.
For years, text-to-speech solutions have supported the assistive community by transforming words on the page into accessible engagement. However, until recently, robotic voices and unnatural rhythms made TTS unappealing for casual listeners. If you didn't need TTS, you probably wouldn't have used TTS. Now, companies like OpenAI have revolutionized speech synthesis. They created voices that sound like humans and not androids and released affordable APIs. Using these large language models (LLMs), you can enjoy warm, nuanced narration. So, wouldn't it be great to use this kind of tech to transform any text into an audiobook?
In this tutorial, you'll use LLM voices to transform any text into audiobooks. You'll build a robust text-to-speech system with OpenAI APIs and Temporal Technology's error mitigation. Forget about manually checking statuses or handling errors. Just focus on converting text while Temporal makes sure everything runs smoothly. When complete, you'll be able to reliably convert any plain text file into an audiobook.
Ready to transform your text into immersive audiobooks? Get started by checking that you have the necessary understanding, tools, and environment set up.
Prerequisites
You can build the project by following this tutorial, or just grab the ready-to-go source from its GitHub repo. This repository has the full source code and can serve as a guide or a fallback if you encounter issues when working through this tutorial. If you want to play first and explore later, you can come back and read through the how-to and background. Here's what you need to get going:
A local Java development environment: Follow "Set up a local development environment" so you're ready to build Temporal applications with Java. Ensure a local Temporal Service is running and that you can access the Temporal Web UI from port
8080. These services are necessary for you to build and run this project.Basic understanding of the Temporal Java SDK: Work through the Hello World in Java tutorial. This covers the basics of getting a Temporal Java SDK project up and running.
OpenAI API access: Sign up for your OpenAI API developer account and create a bearer token. You need this token to access OpenAI services for text-to-speech conversion in your project.
Once caught up with prerequisites, you can build out your Java project directory.
This tutorial is written to be run on a single system, with a single Worker, using the local file system. This is a tutorial project and its implementation is suited for personal and hobbyist use. In production, you wouldn't read or write from a single database file or system. This approach isn't durable so you wouldn't develop durable software with them.
Durable execution refers to maintaining state and progress even in the face of failures, crashes, or server outages. For durable execution, you must be able to rebuild progress state and store information somewhere more reliable. If you expand on this project, consider a API-based Cloud storage solution.
For single-host work, check out this sample, which shows how to pick up work off a shared Task Queue to start a Workflow, and then use a host-specific Task Queue for the following Activity tasks.
Create your Java project structure
Set up your project directory: Set up your source code folder hierarchy by issuing this directory creation command:
mkdir -p TTSWorker/src/main/java/ttsworkerYour directory structure should now look like this:
TTSWorker
└── src
    └── main
        └── java
            └── ttsworker
You can check it with the Unix
treecommand. If the command isn't native to your system, you can install it with standard package managers like Homebrew and apt.Create your build file In your project root folder, create a build.gradle file and add the following contents. Feel free to swap in Maven if you prefer:
group 'ttspackage'; version '0.0.1'
repositories { mavenCentral() }
apply plugin: 'java'
sourceSets.main.java.srcDirs 'src'

dependencies {
    implementation 'io.temporal:temporal-sdk:1.31.0'
    implementation 'org.slf4j:slf4j-nop:2.0.17' // logging suppression
    implementation 'commons-io:commons-io:2.20.0'
    implementation 'com.squareup.okhttp3:okhttp:5.2.0'
    implementation 'org.json:json:20250517'
}

// Run the App
task run(type: JavaExec) {
    classpath = sourceSets.main.runtimeClasspath
    mainClass = 'ttspackage.TTSWorkerApp'
    standardOutput = System.out
}
Review your dependencies and run task: Your dependencies include Temporal's Java SDK, and a few basic libraries:
- com.squareup.okhttp3: Basic HTTP client for network requests
- org.json:json: Parse and manipulate JSON data
- commons-io: Perform file tasks with common input/output routines
- slf4j-nop: Minimizes unnecessary log output
- temporal-sdk: Provides support for building Temporal applications in Java (this is the Temporal SDK)
The run task starts your TTS application.
Create your OpenAI conversion code
Create an interface-implementation pair of files named TTSActivities.java and TTSActivitiesImpl.java in src/main/java/ttsworker and include the following file contents.
This class is responsible for the text-to-speech work in your project:
TTSActivities Source
- TTSActivities.java
- TTSActivitiesImpl.java
Hover your cursor over the code block to reveal the copy-code option.
src/main/java/ttsworker/TTSActivities.java
package ttspackage;

import io.temporal.activity.ActivityInterface;
import java.nio.file.Path;
import java.util.List;

@ActivityInterface
public interface TTSActivities {
    public List<String> readFile(String inputPath);
    public Path createTemporaryFile();
    public void process(String chunk, Path outputPath);
    public String moveOutputFileToPlace(Path tempPath, String inputPath);
}
Hover your cursor over the code block to reveal the copy-code option.
src/main/java/ttsworker/TTSActivitiesImpl.java
package ttspackage;

import io.temporal.activity.ActivityInterface;
import io.temporal.failure.ApplicationFailure;
import java.io.*;
import java.nio.file.*;
import java.util.*;
import java.util.List;
import java.util.logging.Logger;
import okhttp3.*;
import org.apache.commons.io.FilenameUtils;
import org.json.JSONObject;

public class TTSActivitiesImpl implements TTSActivities {
    private String bearerToken = null;

    TTSActivitiesImpl(String bearerToken) {
        this.bearerToken = bearerToken;
    }

    ApplicationFailure fail(String reason, String issue) {
        return ApplicationFailure.newFailure(reason, issue);
    }

    @Override
    public List<String> readFile(String inputPath) {
        Path canonicalPath;

        try {

            if (inputPath == null || inputPath.isEmpty() || !inputPath.endsWith(".txt")) {
                throw fail("Invalid path", "MALFORMED_INPUT");
            }

            if (inputPath.startsWith("~")) {
                String home = System.getProperty("user.home");
                inputPath = home + inputPath.substring(1);
            }

            canonicalPath = Paths.get(inputPath)
                .toAbsolutePath().normalize()
                .toRealPath(LinkOption.NOFOLLOW_LINKS);

            if (!Files.exists(canonicalPath) ||
                !Files.isReadable(canonicalPath) ||
                Files.size(canonicalPath) == 0) {
                throw fail("Invalid path", "MALFORMED_INPUT");
            }

        } catch (InvalidPathException | IOException e) {
            throw fail("Invalid path", "MALFORMED_INPUT");
        }

        String content;
        try {
            content = Files.readString(canonicalPath).trim();
        } catch (IOException e) {
            throw fail("Invalid content", "MISSING_CONTENT");
        }

        int MAX_TOKENS = 512;
        float AVERAGE_TOKENS_PER_WORD = 1.33f;

        List<String> chunks = new ArrayList<>();
        String[] words = content.split("\\s+");
        StringJoiner chunk = new StringJoiner(" ");

        for (String word : words) {
            if ((chunk.length() + word.length()) * AVERAGE_TOKENS_PER_WORD <= MAX_TOKENS) {
                chunk.add(word);
            } else {
                chunks.add(chunk.toString());
                chunk = new StringJoiner(" ");
                chunk.add(word);
            }
        }

        if (chunk.length() > 0) {
            chunks.add(chunk.toString());
        }

        return chunks;
    }

    @Override
    public Path createTemporaryFile() {
        try {
            Path tempFile = Files.createTempFile(null, null);
            return tempFile;
        } catch (IOException | IllegalArgumentException | SecurityException e) {
            fail("Unable to create temporary work file", "FILE_ERROR");
        }
        return null;
    }

    byte[] textToSpeech(String text) throws IOException {
        String apiEndpoint = "https://api.openai.com/v1/audio/speech";

        OkHttpClient client = new OkHttpClient();

        JSONObject json = new JSONObject();
        json.put("model", "tts-1");
        json.put("input", text);
        json.put("voice", "nova"); // see https://platform.openai.com/docs/guides/text-to-speech/voice-options
        json.put("response_format", "mp3");

        MediaType mediaType = MediaType.get("application/json; charset=utf-8");
        RequestBody body = RequestBody.create(json.toString(), mediaType);

        Request request = new Request.Builder()
            .url(apiEndpoint)
            .post(body)
            .addHeader("Authorization", "Bearer " + bearerToken)
            .build();

        try (Response response = client.newCall(request).execute()) {
            if (!response.isSuccessful()) {
                throw new IOException("Unexpected code " + response);
            }
            return response.body().bytes();
        }
    }

    @Override
    public void process(String chunk, Path outputPath) {
        byte[] audio;

        try {
            audio = textToSpeech(chunk);
        } catch (IOException e) {
            throw new RuntimeException(e);
        }

        try {
            Files.write(outputPath, audio,
                            java.nio.file.StandardOpenOption.CREATE,
                            java.nio.file.StandardOpenOption.APPEND);
        } catch (IOException e) {
            throw fail("Unable to write to output file", "FILE_ERROR");
        }
    }

    @Override
    public String moveOutputFileToPlace(Path tempPath, String inputPath) {
        Path newPath = null;
        String extension = ".mp3";
        try {
            Path canonicalPath = Paths.get(inputPath)
                .toAbsolutePath().normalize()
                .toRealPath(LinkOption.NOFOLLOW_LINKS);
            String baseName = FilenameUtils.getBaseName(canonicalPath.toString());
            Path parentDir = canonicalPath.getParent();
            newPath = parentDir.resolve(Paths.get(baseName + extension));
            int suffixCounter = 1;
            while (Files.exists(newPath)) {
                String newFileName = baseName + "-" + suffixCounter + extension;
                newPath = parentDir.resolve(newFileName);
                suffixCounter += 1;
            }
            Files.move(tempPath, newPath, StandardCopyOption.REPLACE_EXISTING);
        } catch (InvalidPathException | IOException e) {
            throw fail("Unable to move output file to destination", "FILE_ERROR");
        }
        return newPath.toString();
    }
}
Now that you've built the Activities file, explore how its components work together.
Activities, like the TTSActivities class, handle potentially unreliable parts of your code, such as calling APIs or working with file systems.
Temporal uses Activities for any action that is prone to failure, allowing them to be retried.
Imagine that the network goes down or your service provider (OpenAI in this case) is temporarily doing maintenance.
Temporal provides a Retry Policy to support "do-overs" for error mitigation.
Activities add check-in points for your application state in your Event History.
When retried, an Activity picks up state from just before it was first called, so it's like the failed attempt never happened.
The TTSActivities class handles text-to-speech operations with the following methods::
readFile: Reads from the specifiedfileInputPathand returns the contents as a chunked list of strings, for well-sized API calls.createTemporaryFile: Creates a temporary file for audio output in a designated folder that is typically cleaned up on system reboots.process: Sends a text chunk to OpenAI for processing, retrieves the TTS audio segment, and appends it to the output file.moveOutputFileToPlace: Moves an audio file to a safe, versioned location in the same folder as the original text file.
Here is how the Activities help the conversion process:
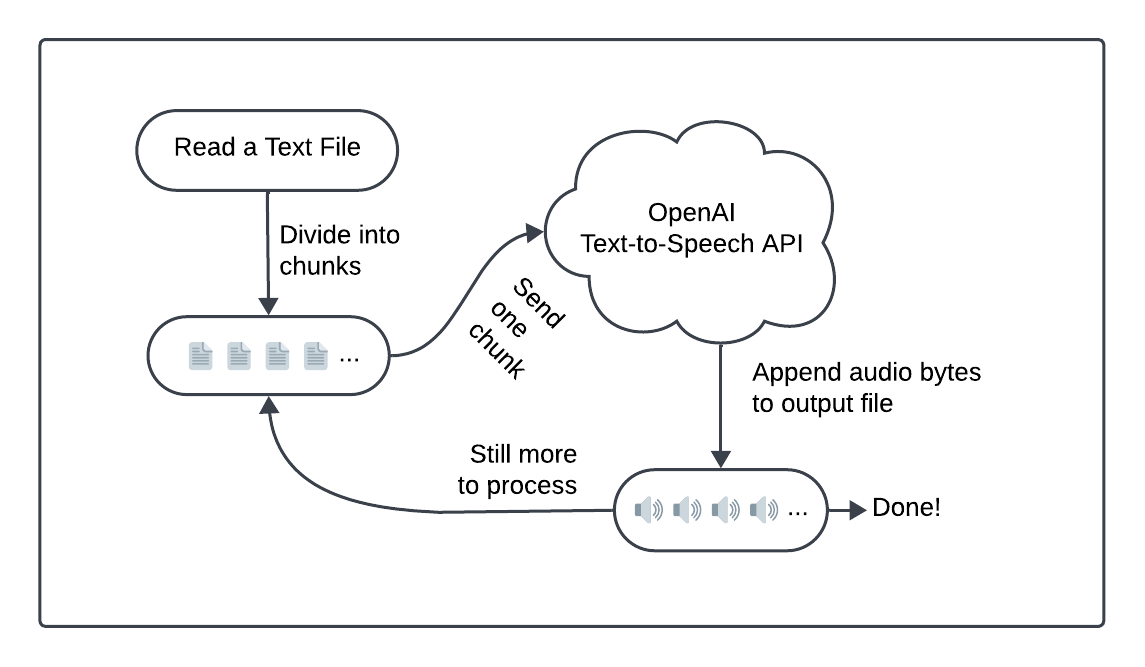
Prepare your text with readFile
The readfile Activity reads and processes text from a file.
Before and during the read, it performs a series of safety checks, such as making sure the file exists and it's readable.
If it encounters any file system issues, it throws an application error.
The following code appears at the end of the Activity. It splits the text into "chunks", each containing part of the source material:
src/main/java/ttsworker/TTSActivitiesImpl.java
// ...
        int MAX_TOKENS = 512;
        float AVERAGE_TOKENS_PER_WORD = 1.33f;

        List<String> chunks = new ArrayList<>();
        String[] words = content.split("\\s+");
        StringJoiner chunk = new StringJoiner(" ");

        for (String word : words) {
            if ((chunk.length() + word.length()) * AVERAGE_TOKENS_PER_WORD <= MAX_TOKENS) {
                chunk.add(word);
            } else {
                chunks.add(chunk.toString());
                chunk = new StringJoiner(" ");
                chunk.add(word);
            }
        }

        if (chunk.length() > 0) {
            chunks.add(chunk.toString());
        }

        return chunks;
As a rule-of-thumb, a typical English word uses 1.33 OpenAI tokens, which is how this code defines the AVERAGE_TOKENS_PER_WORD constant.
When working with other languages, adjust that value to fit with typical word lengths.
Tokens quantify the data processed by OpenAI requests and all OpenAI endpoints use token limits. This code creates chunks with approximately 512 token for each API request. Although the OpenAI token limit is higher than this, this code is conservative to reduce bandwidth for the returned audio bytes.
After building a method to process string data, you'll add code to build an output file in the next steps.
Build a temporary file to store output with createTemporaryFile
The CreateTemporaryFile Activity requests that the system create a new temporary file.
This file stores intermediate results so your work won't affect the main file system:
src/main/java/ttsworker/TTSActivitiesImpl.java
// ...
    public Path createTemporaryFile() {
        try {
            Path tempFile = Files.createTempFile(null, null);
            return tempFile;
        } catch (IOException | IllegalArgumentException | SecurityException e) {
            fail("Unable to create temporary work file", "FILE_ERROR");
        }
        return null;
    }
APIs to create temporary folders and files are provided by nearly every system. Temporary folders and files avoid name collisions, improve security, and isolate partial work. On some systems, temporary folders are optimized for performance so you benefit from faster read and write operations.
With data and an output file, you can begin to create and store your audio.
Convert text to audio with process
The process Activity handles text-to-speech work.
Each time it's called, it sends a chunk of text to the textToSpeech method and appends those results to your output file.
You call it with a String to process and the output destination.
Should the text-to-speech conversion request fail, Temporal can retry the request:
src/main/java/ttsworker/TTSActivitiesImpl.java
// ...
    public void process(String chunk, Path outputPath) {
        byte[] audio;

        try {
            audio = textToSpeech(chunk);
        } catch (IOException e) {
            throw new RuntimeException(e);
        }

        try {
            Files.write(outputPath, audio,
                            java.nio.file.StandardOpenOption.CREATE,
                            java.nio.file.StandardOpenOption.APPEND);
        } catch (IOException e) {
            throw fail("Unable to write to output file", "FILE_ERROR");
        }
    }
The conversion code lives in its own method to make the project easier to follow.
It uses the bearer token, which is stored within the TTSActivities class.
The textToSpeech method calls out to OpenAI to convert a String into a byte[] array.
It creates the request body, and performs a POST operation to an OpenAI endpoint.
It either returns a byte[] array or throws a (retryable) error:
src/main/java/ttsworker/TTSActivitiesImpl.java
// ...
    byte[] textToSpeech(String text) throws IOException {
        String apiEndpoint = "https://api.openai.com/v1/audio/speech";

        OkHttpClient client = new OkHttpClient();

        JSONObject json = new JSONObject();
        json.put("model", "tts-1");
        json.put("input", text);
        json.put("voice", "nova"); // see https://platform.openai.com/docs/guides/text-to-speech/voice-options
        json.put("response_format", "mp3");

        MediaType mediaType = MediaType.get("application/json; charset=utf-8");
        RequestBody body = RequestBody.create(json.toString(), mediaType);

        Request request = new Request.Builder()
            .url(apiEndpoint)
            .post(body)
            .addHeader("Authorization", "Bearer " + bearerToken)
            .build();

        try (Response response = client.newCall(request).execute()) {
            if (!response.isSuccessful()) {
                throw new IOException("Unexpected code " + response);
            }
            return response.body().bytes();
        }
    }
When creating the HTTP request body, customizable endpoint options shape the way your audio gets built:
- model (required): You'll use the basic low-latency 'tts-1' model in this project. Visit OpenAI TTS to read about its available models, which include both standard and high quality options.
- input (required): The maximum length of this string is set at 4096 characters.
- voice (required): The 'nova' voice has a high energy "lively tone". You can listen to samples of other voices at the OpenAI Voice Options page.
- response_format: You'll use the highly portable mp3 output format.
You may want to set additional options by further tweaking the request body. An optional speed parameter (from 0.5 to 4.0, defaults to 1) lets you speed up or slow down the output so the results can be shorter to listen to or elongated for those with audio processing issues. To tune the results to a specific language so the model takes advantage of native inflections. Set language to an ISO-639 code. OpenAI offers over fifty supported languages.
After fully processing your data, you'll need to move the complete audio file from the temporary folder.
Find a location for your output file
In this project, you'll move your output audio file to the same directory as your input text.
The moveOutputFileToPlace Activity handles this process by versioning the output path to prevent overwriting an existing file:
src/main/java/ttsworker/TTSActivitiesImpl.java
// ...
    public String moveOutputFileToPlace(Path tempPath, String inputPath) {
        Path newPath = null;
        String extension = ".mp3";
        try {
            Path canonicalPath = Paths.get(inputPath)
                .toAbsolutePath().normalize()
                .toRealPath(LinkOption.NOFOLLOW_LINKS);
            String baseName = FilenameUtils.getBaseName(canonicalPath.toString());
            Path parentDir = canonicalPath.getParent();
            newPath = parentDir.resolve(Paths.get(baseName + extension));
            int suffixCounter = 1;
            while (Files.exists(newPath)) {
                String newFileName = baseName + "-" + suffixCounter + extension;
                newPath = parentDir.resolve(newFileName);
                suffixCounter += 1;
            }
            Files.move(tempPath, newPath, StandardCopyOption.REPLACE_EXISTING);
        } catch (InvalidPathException | IOException e) {
            throw fail("Unable to move output file to destination", "FILE_ERROR");
        }
        return newPath.toString();
    }
The code iterates through potential new paths, adding suffix counters (-1, -2, etc) as needed to avoid path conflicts.
Once found, it uses File.move to bring the file out of the temporary folder and into place.
This section talked about Activities, the individual and potentially unreliable processes that perform work that might fail. Next, you'll create a Workflow, which sets the overall business logic for your application.
Define your Workflow with Temporal
You've seen the pieces that perform the conversion work but you haven't tied the process together. In this section, you'll build a Temporal Workflow to process a text-to-speech conversion from start to finish. Workflows create the overall flow of your application's business process. It's essentially a sequence of steps written in your programming language.
Now, create an interface-implementation pair of files named TTSWorkflow.java and TTSWorkflowImpl.java in src/main/java/ttsworker.
Include the following file contents, which are responsible for the text-to-speech work process in your project:
TTSWorkflow Source
- TTSWorkflow.java
- TTSWorkflowImpl.java
Hover your cursor over the code block to reveal the copy-code option.
src/main/java/ttsworker/TTSWorkflow.java
package ttspackage;

import io.temporal.workflow.QueryMethod;
import io.temporal.workflow.WorkflowInterface;
import io.temporal.workflow.WorkflowMethod;

@WorkflowInterface
public interface TTSWorkflow {
    @WorkflowMethod
    public String startWorkflow(String filePathString);

    @QueryMethod
    public String fetchMessage();
}
Hover your cursor over the code block to reveal the copy-code option.
src/main/java/ttsworker/TTSWorkflowImpl.java
package ttspackage;

import io.temporal.activity.ActivityOptions;
import io.temporal.common.RetryOptions;
import io.temporal.client.WorkflowStub;
import io.temporal.workflow.*;
import java.io.IOException;
import java.nio.file.Path;
import java.time.Duration;
import java.util.List;
import org.slf4j.Logger;

public class TTSWorkflowImpl implements TTSWorkflow {
    public TTSWorkflowImpl() { }

    private static final Logger logger = Workflow.getLogger(TTSWorkflowImpl.class);
    private String message = "Conversion request received";

    private ActivityOptions activityOptions = ActivityOptions.newBuilder().setScheduleToCloseTimeout(Duration.ofSeconds(120)).build();
    private TTSActivities encodingStub = Workflow.newActivityStub(TTSActivities.class, activityOptions);

    public String fetchMessage() {
        return message;
    }

    public String startWorkflow(String fileInputPath) {
        List<String> chunks = encodingStub.readFile(fileInputPath);
        int chunkCount = chunks.size();
        logger.info("File content has " + chunkCount + " chunk(s) to process.");

        Path tempOutputPath = encodingStub.createTemporaryFile();
        logger.info("Created temporary file for processing: " + tempOutputPath.toString());

        for (int index = 0; index < chunkCount; index += 1) {
            message = "Processing part " + (index + 1) + " of " + chunkCount;
            logger.info(message);
            encodingStub.process(chunks.get(index), tempOutputPath);
        }
        String outputPath = encodingStub.moveOutputFileToPlace(tempOutputPath, fileInputPath);
        message = "Processing of file is done " + outputPath;
        logger.info("Output file: " + outputPath);
        return outputPath;
    }
}
The TTSWorkflow class defines a complete business logic flow, in this case transforming the text within a file pointed to by the input path parameter, into spoken audio.
As you see, this code reads the source file, creates the temporary file, processes each chunk, and finally moves the output file into place.
The function returns the file output path for the generated mp3 results.
Workflows coordinate Activities, which are the methods you created in the previous section. You use Activities to make API requests, access the file system, or perform other non-deterministic operations. In contrast, every Workflow must be deterministic so you perform all your non-deterministic work in Activities.
This is the complete business logic code for this application:
src/main/java/ttsworker/TTSWorkflowImpl.java
package ttspackage;

import io.temporal.activity.ActivityOptions;
import io.temporal.common.RetryOptions;
import io.temporal.client.WorkflowStub;
import io.temporal.workflow.*;
import java.io.IOException;
import java.nio.file.Path;
import java.time.Duration;
import java.util.List;
import org.slf4j.Logger;

public class TTSWorkflowImpl implements TTSWorkflow {
    public TTSWorkflowImpl() { }

    private static final Logger logger = Workflow.getLogger(TTSWorkflowImpl.class);
    private String message = "Conversion request received";

    private ActivityOptions activityOptions = ActivityOptions.newBuilder().setScheduleToCloseTimeout(Duration.ofSeconds(120)).build();
    private TTSActivities encodingStub = Workflow.newActivityStub(TTSActivities.class, activityOptions);

    public String fetchMessage() {
        return message;
    }

    public String startWorkflow(String fileInputPath) {
        List<String> chunks = encodingStub.readFile(fileInputPath);
        int chunkCount = chunks.size();
        logger.info("File content has " + chunkCount + " chunk(s) to process.");

        Path tempOutputPath = encodingStub.createTemporaryFile();
        logger.info("Created temporary file for processing: " + tempOutputPath.toString());

        for (int index = 0; index < chunkCount; index += 1) {
            message = "Processing part " + (index + 1) + " of " + chunkCount;
            logger.info(message);
            encodingStub.process(chunks.get(index), tempOutputPath);
        }
        String outputPath = encodingStub.moveOutputFileToPlace(tempOutputPath, fileInputPath);
        message = "Processing of file is done " + outputPath;
        logger.info("Output file: " + outputPath);
        return outputPath;
    }
}
This class creates ActivityOptions, which set the policies Temporal uses for retrying failed Activities.
Then it builds the encodingStub, which allows your application to run Activities as they are managed by the Temporal system.
Temporal management (called "orchestration") enables the Temporal Service to track Workflow and Activity progress and state, and to manage Activities when they encounter errors.
This progress is stored centrally on the Temporal Service, so it can resume if interrupted. That means you can always find ways to fix problems and keep going and reliably deliver your results. Temporal calls this Durable Execution. It allows your application to mitigate errors and keep going without repeating work you've already done. That makes your apps both reliable and efficient.
After the options and encoding stub are two further methods:
fetchMessage: This is a Temporal Query method. Some conversion tasks take a while to complete. Queries can "peek" at running processes and fetch information about how that work is proceeding. This method returns the status, stored in themessageinstance variable. This is updated at each stage of the conversion process.startWorkflow: Every Workflow has one entry point, which is annotated with@WorkflowMethodin the class interface. It defines a complete business logic flow, in this case transforming the text within a file pointed to by thefileInputPathparameter, into spoken audio. As you see, this code reads the source file, creates the temporary file, processes each chunk, and finally moves the output file into place. The method returns anotherString, a file output path for the generated mp3 results.
With your Workflows and Activities in place, you can now write a Worker application. A Worker hosts your Activities and Workflows and polls a Temporal Service-provided Task Queue looking for work to do.
Create your Worker
Add TTSWorkerApp.java in src/main/java/ttsworker and add the following file contents:
src/main/java/ttsworker/TTSWorkerApp.java
package ttspackage;

import io.temporal.client.WorkflowClient;
import io.temporal.serviceclient.WorkflowServiceStubs;
import io.temporal.worker.Worker;
import io.temporal.worker.WorkerFactory;
import java.util.logging.Logger;

public class TTSWorkerApp {
    public static String sharedTaskQueue = "tts-task-queue";
    private static final Logger logger = Logger.getLogger(TTSWorkerApp.class.getName());

    public static void main(String[] args) {
        String bearerToken = System.getenv("OPEN_AI_BEARER_TOKEN");
        if (bearerToken == null || bearerToken.isEmpty()) {
            logger.severe("Environment variable OPEN_AI_BEARER_TOKEN not found");
            System.exit(1);
        }
        bearerToken = bearerToken.trim();
        bearerToken = bearerToken.replaceAll("[\\P{Print}]", "");

        WorkflowServiceStubs service = WorkflowServiceStubs.newLocalServiceStubs();
        WorkflowClient client = WorkflowClient.newInstance(service);
        WorkerFactory factory = WorkerFactory.newInstance(client);
        Worker worker = factory.newWorker(sharedTaskQueue);
        worker.registerWorkflowImplementationTypes(TTSWorkflowImpl.class);
        worker.registerActivitiesImplementations(new TTSActivitiesImpl(bearerToken));
        factory.start();
    }
}
Every Worker polls Task Queues to pick up Workflow and Activity Tasks.
The Task Queue for this project is named tts-task-queue.
You'll use this queue to submit conversion requests.
Normally you'd build a dedicated full stack solution that submits requests to the Temporal Service and retrieves the results when they're complete.
For this project, you issue your request through the command-line.
A few more things about this code:
- As a standalone application, this Worker has a
mainmethod. - The app starts by checking for an OpenAI bearer token and stores it as a static member of the
TTSActivitiesImplclass. - Next, it creates and runs a Worker by calling
runWorker, relaying its arguments. This method centralizes Worker-specific code for clarity but your code could live inmainif you needed it to. - The
runWorkermethod builds a Client, a class that can communicate with the Temporal service, and passes it to a Java[WorkerFactory](https://docs.temporal.io/develop/java/core-application#run-a-dev-worker). The factory builds a Worker and the code runs the factory, bringing the Worker online and ready to start processing Tasks.
Your complete project structure will now look like this:
TTSWorker
├── build.gradle
└── src
    └── main
        └── java
            └── ttsworker
                ├── TTSActivities.java
                ├── TTSActivitiesImpl.java
                ├── TTSWorkerApp.java
                ├── TTSWorkflow.java
                └── TTSWorkflowImpl.java
After creating this project, it's time to try it out. Start by running the Worker application.
Run the Worker
Follow these steps to get your Worker up and running.
Run the Development Server
Make sure the Temporal development server is running and using a persistent store. Interrupted work can be picked up and continued without repeating steps, even if you experience server interruptions:
temporal server start-dev \
    --ui-port 8080 \
    --db-filename /path/to/your/temporal.db
Once running, connect to the Temporal Web UI and verify that the server is working.
Instantiate Your Bearer Token
Create an environment variable called OPEN_AI_BEARER_TOKEN to configure your OpenAI credentials.
If you set this value using a shell script, make sure to source the script so the variable carries over past the script execution.
The environment variable must be set in the same terminal session where you run your application.
When using your application, you must set your OPEN_AI_BEARER_TOKEN environment variable in the same shell before execution.
The application checks for the token and if it's not set, it will error.
Run the Worker application
Build the Worker app:
gradle buildStart the app running:
gradle run
If the Worker can't fetch a bearer token from the shell environment, it will fail loudly at launch. This early check prevents you from running jobs and waiting to find out that you forgot to set the bearer token until you're well into the Workflow process.
Now that the Worker is running, you can submit jobs for text-to-speech processing.
Submit narration jobs
For this tutorial, use the Temporal CLI tool to build audio from text files.
Open a new terminal window.
You'll use the Workflow execute subcommand to watch the execution in real time from your command line:
temporal workflow execute \
    --type TTSWorkflow \
    --task-queue tts-task-queue \
    --input '"/path/to/your/text-file.txt"' \
    --workflow-id "your-workflow-id"
- type: The name of this text-to-speech Workflow is
TTSWorkflow. - task-queue: This Worker polls the "tts-task-queue" Task Queue.
- input: Pass a quoted JSON string with a
/path/to/your/input/text-file. - workflow-id: Set a descriptive name for your Workflow Id. This makes it easier to track your Workflow Execution in the Web UI. The identifier you set doesn't affect the input text file or the output audio file names.
For example, you might run:
temporal workflow execute \
    --type TTSWorkflow \
    --task-queue tts-task-queue \
    --input '"~/Desktop/chapter-1.txt"' \
    --workflow-id "chapter-1-tts"
Find your output file
Your output is collected in a system-provided temporary file.
After, your generated MP3 audio is moved into the same folder as your input text file.
It uses the same name replacing the txt extension with mp3.
If an output file already exists, the project versions it to prevent name collisions.
The TTSWorkflow returns a string, the /path/to/your/output/audio-file.
Check the Web UI Input and Results section after the Workflow completes.
The results path is also displayed as part of the CLI's workflow execute command output and in the Worker logs.
- Do not modify your input or output files while the Workflow is running.
- The Workflow fails if you don't pass a valid text file named with a
txtextension.
Check your progress
This project includes a Query to check progress during long processes. Run it in a separate terminal window or tab:
temporal workflow query \
    --type fetchMessage \
    --workflow-id "your-workflow-id"
The Query returns a status reporting how many chunks have completed. For example,
% workflow query --type fetchMessage --workflow-id chapter-1
Query result:
  QueryResult  "Processing part 8 of 47"
%
This Workflow has completed about 17% of its work.
Validate your audio output
The open source checkmate app validates MP3 files for errors.
$ mpck -v chapter-1.mp3

SUMMARY: chapter-1.mp3
    version                       MPEG v2.0
    layer                         3
    bitrate                       160000 bps
    samplerate                    24000 Hz
    frames                        23723
    time                          9:29.352
    unidentified                  0 b (0%)
    stereo                        yes
    size                          11120 KiB
    ID3V1                         no
    ID3V2                         no
    APEV1                         no
    APEV2                         no
    last frame
        offset                    11386560 b (0xadbec0)
        length                    480
    errors                        none
    result                        Ok
With no errors found, your audio is ready to use. Fire up your favorite player and listen to your creation.
Conclusion
In this tutorial, you created an OpenAI solution that converts text files into audio. You used Temporal error mitigation to make sure that failed API requests could be retried and catastrophic events could be recovered. With just a few source files, you created a complete working solution, building a durable, reliable system that builds audiobooks from simple text files.
Now that you've completed this tutorial, check out some other great Temporal Java projects or learn more about Temporal by taking our free courses. We provide hands-on projects for supported SDK languages including Java, Go, Python, TypeScript, and PHP.