Run your first Temporal application with the Ruby SDK
- Level: ⭐ Temporal beginner
- Time: ⏱️ ~20 minutes
- Goals: 🙌
- Explore Temporal's core terminology and concepts
- Start a local Temporal Service
- Review Temporal application code written using the Ruby SDK
- Run the application multiple times, observing how it overcomes different failure scenarios
- Use the Temporal Web UI to view details of each execution
Introduction
As a developer in today's world, many of the challenges that you face stem from the fact that modern applications are effectively distributed systems. The components from which applications are composed are deployed to multiple machines, sometimes in different data centers or cloud providers, and often rely on third-party services and APIs. Unfortunately, networks go down, services become unresponsive, hardware fails, and applications crash.
Most developers attempt to address this by developing workarounds for each potential problem. For example, you might write code to handle retries and timeouts in order to work around a service or network outage. Likewise, you might rearchitect your application to use a database or message queue to avoid losing state in case of a crash. All too often, the result is code that takes longer to develop, is harder to debug, and becomes a burden to maintain.
Temporal provides a better way to address these challenges. Instead of adding complexity to your application, you build on the foundation provided by the Temporal platform. Durable Execution ensures that your application will survive a crash—even if it was caused by hardware failure—recovering and then continuing on as if it never even happened. Its built-in support for retries and timeouts enables your application to overcome service and network outages. As a result, you'll be able to create reliable and scalable applications that are faster to develop and easier to maintain.
In this tutorial, you'll explore the code for a Temporal application and run that application multiple times, observing how it works in both success and failure scenarios. You'll also use Temporal's Web UI to gain visibility into what took place during execution.
Prerequisites
Before starting this tutorial:
- Set up a local development environment for Temporal Applications written in the Ruby programming language
- Ensure you have Git installed to clone the project
Application overview
The project in this tutorial mimics a "money transfer" application. It is
implemented with a single Workflow,
which orchestrates the execution of two
Activities (Withdraw and Deposit)
that move money between the accounts.
To perform a money transfer, you will do the following:
- Launch a Worker. Since a Worker is responsible for executing the Workflow and Activity code, at least one Worker must be running for the money transfer to make progress.
- Submit a Workflow Execution request to the Temporal Service. After the Worker communicates with the Temporal Service, the Worker will begin executing the Workflow and Activity code. It reports the results to the Temporal Service, which tracks the progress of the Workflow Execution.
The following diagram illustrates the communication that takes place when you start the money transfer Workflow:
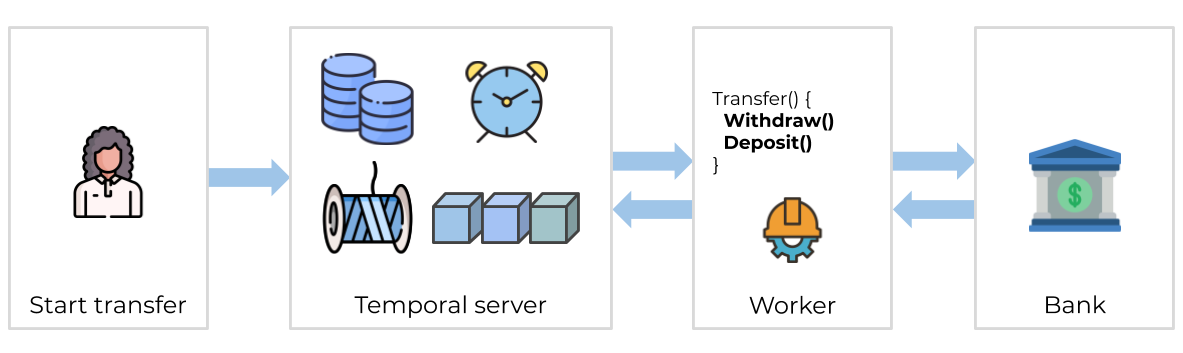
Notice that the Temporal Service doesn't run your code. Your Worker, Workflow, and Activities run on your infrastructure, just like your other applications.
Now that you know how the application works, it's time to try it for yourself.
 Retrieve the application source code
The application source code is available in a GitHub repository named
money-transfer-project-template-ruby.
Open a new terminal window and clone the repository:
git clone https://github.com/temporalio/money-transfer-project-template-ruby/
Once that's complete, change to the project directory:
cd money-transfer-project-template-ruby
This repository also serves as a GitHub Template, which means that you can use it as the foundation for creating your own project. See Creating a Repository from a Template in GitHub's documentation for details.
Next, you'll use the temporal
command-line interface (CLI) to start a
local Temporal Service.
Start a local Temporal Service
Make sure you've installed Temporal CLI on your local machine.
Run the following command:
temporal server start-dev --db-filename temporal.db --ui-port 8080
This starts the Temporal Service, which will listen for connections on the
default port (7233). It specifies a custom port (8080) for the Temporal Web
UI. It also specifies the path to a file (temporal.db) where the Temporal
Service will store its data.
The Temporal Service started with the temporal CLI is intended for local
development, so it uses an in-memory database by default. The --db-filename
option overrides that behavior by specifying the path to a file where the
data should be persisted. This enables it to retain information after you
restart the service, as it would in a production deployment.
This file will be created if it does not exist. Be sure to specify the same path each time you start the Temporal Service so that it will have access to data saved during your previous session.
Explore the Workflow and Activity Definitions
Workflow Definition Overview
The fundamental building block in a Temporal application is the Workflow Definition, which is code that orchestrates a sequence of steps.
In the Ruby SDK, a Workflow Definition is a class that extends
Temporalio::Workflow::Definition. The execute method is its
entry point for execution and is invoked when the Workflow is started.
Data supplied as input to the Workflow Execution is available through
the parameter(s) defined in the execute method.
Activity Definition Overview
When a step involves the possibility of failure, such as calling a service, querying a database, or writing data to a file, its code is not allowed in the Workflow Definition. Instead, that code goes into a separate method, known as an Activity Definition.
At first glance, you might think you can incorporate your logic into the Workflow Definition. However, Temporal Workflows have certain deterministic constraints Operations that could behave differently from one invocation to the next, which includes any operations that interact with an external system, are not allowed in the Workflow Definition—it must go in an Activity instead. This separation of code is fundamental to how Temporal achieves Durable Execution.
Use Activities for your business logic, and use Workflows to orchestrate the Activities.
Activities are defined in much the same way as Workflows. The key
difference is that they derive from the Temporalio::Activity::Definition
class. They can accept input data through the parameter(s) defined in
the Activity's execute method.
As mentioned earlier, this Workflow relies on two Activities to move money
between two accounts. It uses the Withdraw Activity to debit the source
account and the Deposit Activity to credit the target account. However, it
also has a third Activity (Refund), which is used for failure handling.
To understand the role of the Refund Activity, imagine that the withdrawal
succeeds, but the deposit fails because the recipient closed their account.
A deposit that fails due to a network outage can be resolved by retrying the
deposit, but this is a permanent error. To ensure that the money isn't lost,
you must undo the transaction you started. A common technique for this in
distributed systems is known as the
saga pattern,
which uses one or more compensating transactions to revert earlier
operations. The Refund Activity, which is called if the deposit fails,
is an example of this. It returns the withdrawn money back to the sender's
account.
Workflow Definition Code
Here is the Workflow Definition for the money transfer:
require_relative 'activities'
require_relative 'shared'
require 'temporalio/retry_policy'
require 'temporalio/workflow'

module MoneyTransfer
  # Temporal Workflow that withdraws the specified amount from the source
  # account and deposits it into the target account, refunding the source
  # account if the deposit cannot be completed.
  class MoneyTransferWorkflow < Temporalio::Workflow::Definition
    def execute(details)
      retry_policy = Temporalio::RetryPolicy.new(
        max_interval: 10,
        non_retryable_error_types: [
          'InvalidAccountError',
          'InsufficientFundsError'
        ]
      )

      Temporalio::Workflow.logger.info("Starting workflow (#{details})")

      withdraw_result = Temporalio::Workflow.execute_activity(
        BankActivities::Withdraw,
        details,
        start_to_close_timeout: 5,
        retry_policy: retry_policy
      )
      Temporalio::Workflow.logger.info("Withdrawal confirmation: #{withdraw_result}")

      begin
        deposit_result = Temporalio::Workflow.execute_activity(
          BankActivities::Deposit,
          details,
          start_to_close_timeout: 5,
          retry_policy: retry_policy
        )
        Temporalio::Workflow.logger.info("Deposit confirmation: #{deposit_result}")

        "Transfer complete (transaction IDs: #{withdraw_result}, #{deposit_result})"
      rescue Temporalio::Error::ActivityError => e
        Temporalio::Workflow.logger.error("Deposit failed: #{e}")

        # Since the deposit failed, attempt to recover by refunding the withdrawal
        begin
          refund_result = Temporalio::Workflow.execute_activity(
            BankActivities::Refund,
            details,
            start_to_close_timeout: 5,
            retry_policy: retry_policy
          )
          Temporalio::Workflow.logger.info("Refund confirmation: #{refund_result}")

          "Transfer complete (transaction IDs: #{withdraw_result}, #{refund_result})"
        rescue Temporalio::Error::ActivityError => refund_error
          Temporalio::Workflow.logger.error("Refund failed: #{refund_error}")
        end
      end
    end
  end
end
By default, every Activity Execution is associated with a
Retry Policy, which
specifies that an Activity will be retried soon after it fails and will be
retried continuously (with a delay between each attempt) until it succeeds
or is requested to stop. You can change this behavior to suit your needs, as
this Workflow Definition does. For demonstration purposes, it specifies that
the delay between retry attempts should be limited to two seconds, that there
should be no more than three retry attempts, and that a failure caused by
InsufficientFundsError should not be retried at all.
As you see, most of the code is devoted to executing the sequence of steps (Activities) for the money transfer. It first withdraws from the source account, attempts to deposit into the target account, and refunds the money to the source account if the deposit fails. Each of those Activities receives input data (containing the account number and amount of the transfer) and returns a result (a transaction ID provided by the bank as confirmation).
We've chosen a money transfer scenario for this introductory tutorial because it's a familiar concept and gives you an idea of how Temporal applications can handle different types of failures. However, money movement is a complex subject and this tutorial makes no attempt to handle every possible situation. For example, it doesn't attempt to revert the transaction upon cancellation. It also doesn't handle failure of the refund operation, which might involve a human-in-the-loop step in which someone is notified of the error and can intervene directly.
This example is designed to demonstrate several core features to someone learning the Temporal platform. It is not intended for production use.
Input Data
The Workflow's execute method is passed a struct called TransferDetails,
which defines the source (sender) account, target (recipient) account,
amount of the transfer, and a user-supplied reference ID that serves to
uniquely identify this transfer operation. Here is the definition of the
TransferDetails struct, which is defined at the bottom of shared.rb, a
file that contains code used by multiple parts of this application:
  # TransferDetails is the input to MoneyTransferWorkflow (and its Activities).
  # It specifies the source (sender) and target (recipient) accounts, the amount
  # to transfer, and a reference ID that uniquely identifies the transaction.
  TransferDetails = Struct.new(:source_account, :target_account, :amount, :reference_id) do
    def to_s
      "TransferDetails { #{source_account}, #{target_account}, #{amount}, #{reference_id} }"
    end
  end
Although it's possible to specify a list of individual fields as input, it's considered a best practice to define a single, serializable data structure that will serve as input. This enables you to evolve your Workflows in the future by changing the composition of the data structure instead of changing the method signature.
Notice that the TransferDetails struct includes a reference_id field.
Some APIs let you send a unique idempotency key along with the transaction
details to guarantee that if you retry the transaction due to some kind of
failure, the API you're calling will use the key to ensure it only executes
the transaction once. This example generates the reference ID using Ruby's
UUID support.
Activity Definition Code
The Workflow Definition above shows when and how the Activities are invoked
during execution. The following excerpt from the activities.rb file shows
how they are defined:
require_relative 'shared'
require 'temporalio/activity'

module MoneyTransfer
  module BankActivities
    # Activity that withdraws a specified amount from the source account,
    # raising an InsufficientFundsError if the amount is too large.
    # It returns the transaction ID for the withdrawal.
    class Withdraw < Temporalio::Activity::Definition
      def execute(details)
        puts("Doing a withdrawal from #{details.source_account} for #{details.amount}")
        raise InsufficientFundsError, 'Transfer amount too large' if details.amount > 1000

        # Uncomment to expose a bug and cause the Activity to fail
        # x = details.amount / 0

        # Generate and returnt the transaction ID
        "OKW-#{details.amount}-#{details.source_account}"
      end
    end

    # Activity that deposits a specified amount into the target account,
    # raising an InvalidAccountError if that is not a valid account.
    # It returns the transaction ID for the deposit.
    class Deposit < Temporalio::Activity::Definition
      def execute(details)
        puts("Doing a deposit into #{details.target_account} for #{details.amount}")
        raise InvalidAccountError, 'Invalid account number' if details.target_account == 'B5555'

        # Generate and returnt the transaction ID
        "OKD-#{details.amount}-#{details.target_account}"
      end
    end

    # Activity that deposits a specified amount into the source account,
    # intended for cases in which a previous deposit attempt failed. This
    # is defined as a separate Activity, distinct from the Deposit, so
    # that it can perform any special handling that might be needed to
    # process the refund (such as making a call to a third-party system).
    # In this implementation, however, the behavior is identical to the
    # deposit (with the exception of the transaction ID and log message).
    # It returns the transaction ID for the refund.
    class Refund < Temporalio::Activity::Definition
      def execute(details)
        puts("Refunding #{details.amount} back to account #{details.source_account}")

        # Generate and returnt the transaction ID
        "OKR-#{details.amount}-#{details.source_account}"
      end
    end
  end
end
The Withdraw Activity takes the details about the transfer, simulates a
call to a service to process the withdrawal, and returns a transaction ID.
Note that while it happens to use the same input (the TransferDetails
struct) as the Workflow, that need not be the case. It was done here for
simplicity, since the Activity uses many of the same fields.
This Activity will fail with InsufficientFundsError if the amount exceeds
$1000. You may have observed in the Workflow Definition that this specific
type of error will not be retried. Most errors in Temporal are automatically
retried, enabling a Workflow to overcome intermittent failures and outages.
The custom Retry Policy used here declares that InsufficientFundsError will
not be retried, and since there's no custom code to trap the error, the
Workflow Execution will fail if this error occurs. We chose this design
in the tutorial to demonstrate how you can customize Retry Policies to
match your business logic. If you were implementing this in the real world,
you might instead consider letting the Withdraw retry until the source
account finally does have sufficient funds, after which the money transfer
would automatically proceed.
The Deposit Activity is similar to the Withdraw Activity. It also has
a special case, which is that it will fail with InvalidAccountError if the
target account value is B5555. The Workflow Definition does trap this
(generically, as Temporalio::Error::ActivityError) and compensates the
source account by executing the Refund Activity to return the withdrawn
funds.
The Refund Activity Definition is almost identical to Deposit. While
you could reuse the existing Deposit Activity to refund the money, using
a separate Activity lets you add additional logic around the refund process,
such as logging, sending notifications, or making a call to a third-party
service.
Explore the Worker configuration
As you learned earlier, a Worker is responsible for executing the Workflow and Activity code.
A Worker:
- polls a specific Task Queue within the Temporal Service
- accepts Tasks that correspond to the Workflow and Activity Types that it has been configured to support
- knows how to execute the code (Workflow and Activity Definitions) based on details provided in those Tasks
- reports the results of execution to the Temporal Service, which tracks the history and progress of each Workflow Execution
The worker.rb file in this project contains the code used to configure
and start the Worker. It registers support for the money transfer Workflow
and the three Activities described earlier. It also specifies the name
of the Task Queue on the Temporal Service that the Worker should poll.
A Task Queue is where Temporal Workers look for Tasks about Workflows and
Activities to execute. Each Task Queue is identified by a name, which you will
specify when you configure the Worker and again in the code that starts the
Workflow Execution. To ensure that the same name is used in both places, this
project follows the recommended practice of specifying the Task Queue name in
a constant referenced from both places. In this project, that constant is named
TASK_QUEUE_NAME, which is defined in the shared.rb file.
Here is the code used to configure and start the Worker:
require_relative 'activities'
require_relative 'shared'
require_relative 'workflow'
require 'logger'
require 'temporalio/client'
require 'temporalio/worker'

# Create a Temporal Client that connects to a local Temporal Service, uses
# a Namespace called 'default', and displays log messages to standard output
client = Temporalio::Client.connect(
  'localhost:7233',
  'default',
  logger: Logger.new($stdout, level: Logger::INFO)
)

# Create a Worker that polls the specified Task Queue and can
# fulfill requests for the specified Workflow and Activities
worker = Temporalio::Worker.new(
  client:,
  task_queue: MoneyTransfer::TASK_QUEUE_NAME,
  workflows: [MoneyTransfer::MoneyTransferWorkflow],
  activities: [MoneyTransfer::BankActivities::Withdraw,
               MoneyTransfer::BankActivities::Deposit,
               MoneyTransfer::BankActivities::Refund]
)

# Start the Worker, which will poll the Task Queue until stopped
puts 'Starting Worker (press Ctrl+C to exit)'
worker.run(shutdown_signals: ['SIGINT'])
Now that you've seen the code, you will launch a Worker so that it will be ready to run the money transfer code when you submit a Workflow Execution request later in the tutorial.
Launch a Worker
Open a new terminal and change to the project directory:
cd money-transfer-project-template-ruby
In this new terminal, launch a Worker by running the following command:
bundle exec ruby worker.rb
The terminal output looks like this:
Starting Worker (press Ctrl+C to exit)
There will be no further output for now. The Worker is now polling the Task Queue, but since there haven't yet been any Workflow Execution requests, that queue is currently empty.
In the next section, you will run a Ruby program to submit a request, which will create Tasks for the Worker to perform.
Review the code that starts the Workflow Execution
There are multiple ways to start a Workflow with Temporal. You can do it by
using the temporal CLI or the Temporal Web UI. Another option is to do it
through code, which is what you'll do in this tutorial since it's the typical
approach for real-world applications.
All three methods involve connecting to the Temporal Service, providing the Task Queue name, and specifying the Workflow Type along with any input data. In this tutorial, you'll run a small Ruby program that does these things.
This tutorial uses a program within the same project to start the Workflow, but that's not required. In fact, it's common to request Workflow Execution from code that lives in a separate project, or which is part of a different application, and which might be implemented in a different programming language. For example, a web application written in TypeScript could initiate a money transfer by submitting a Workflow Execution request when a user clicks a button.
require_relative 'shared'
require_relative 'workflow'
require 'securerandom'
require 'temporalio/client'

# Create the Temporal Client that the Worker will use to connect to the
# Temporal Service (in this case, it will connect to one running locally,
# on the standard port, and use the default namespace)
client = Temporalio::Client.connect('localhost:7233', 'default')

# Default values for the payment details (can override via positional commandline parameters)
details = MoneyTransfer::TransferDetails.new('A1001', 'B2002', 100, SecureRandom.uuid)
details.source_account = ARGV[0] if ARGV.length >= 1
details.target_account = ARGV[1] if ARGV.length >= 2
details.amount = ARGV[2].to_i if ARGV.length >= 3
details.reference_id = ARGV[3] if ARGV.length >= 4

# Use the Temporal Client to submit a Workflow Execution request to the
# Temporal Service, wait for the result returned by executing the Workflow,
# and then display that value to standard output.
handle = client.start_workflow(
  MoneyTransfer::MoneyTransferWorkflow,
  details,
  id: "moneytransfer-#{details.reference_id}",
  task_queue: MoneyTransfer::TASK_QUEUE_NAME
)

puts "Initiated transfer of $#{details.amount} from #{details.source_account} to #{details.target_account}"
puts "Workflow ID: #{handle.id}"

# Keep running (and retry) if the Temporal Service becomes unavailable
begin
  puts "Workflow result: #{handle.result}"
rescue Temporalio::Error::RPCError
  puts 'Temporal Service unavailable while awaiting result'
  retry
end
This code uses a Temporal Client to connect to the Temporal Service, calling its
start_workflow method to request execution. This returns a handle, and calling
result on that handle will block until execution is complete, at which point
it provides the result.
Start the Workflow Execution
Open a new terminal and change to the project directory:
cd money-transfer-project-template-ruby
In this new terminal, run the program to start the Workflow:
bundle exec ruby starter.rb
You should see output similar to the following:
Initiated transfer of $100 from A1001 to B2002
Workflow ID: moneytransfer-2926a650-1aaf-49d9-bf87-0e3a09ef7b32
Workflow result: Transfer complete (transaction IDs: OKW-100-A1001, OKD-100-B2002)
Next, you'll experience how Temporal provides visibility into your applications through it Web UI.
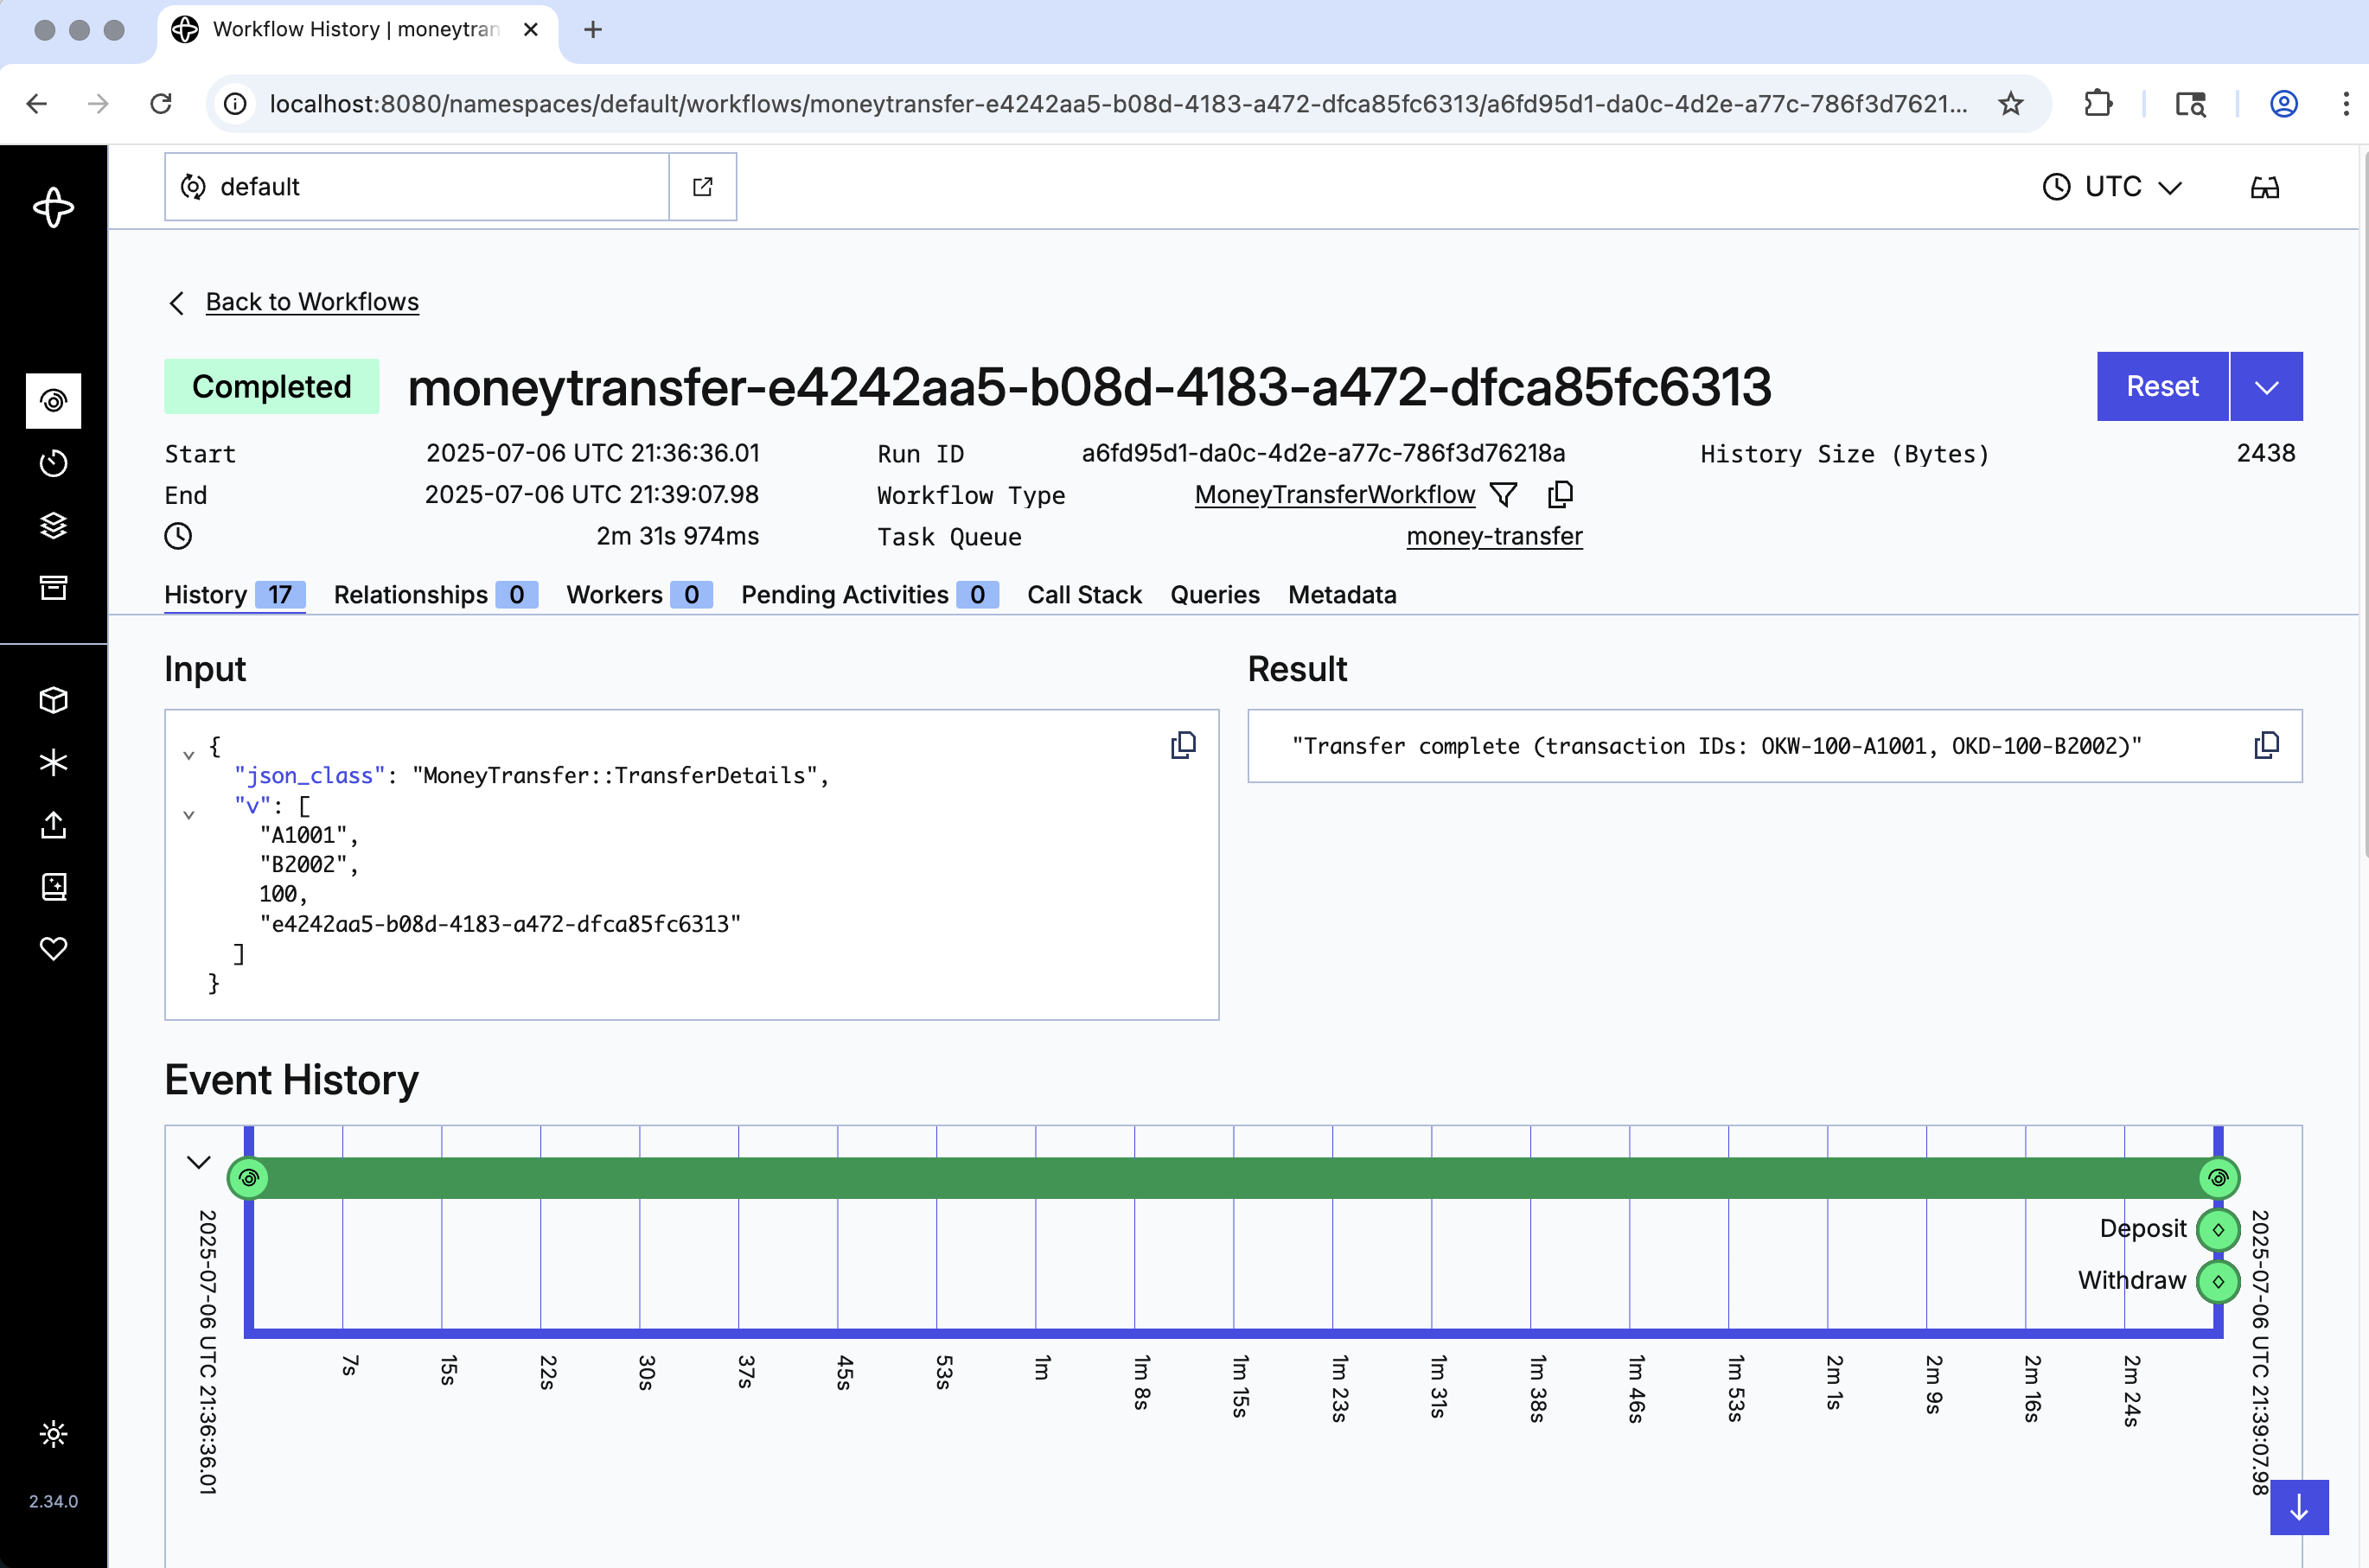
View the Workflow Execution in the Temporal Web UI
Temporal's Web UI provides a convenient way to see details about both current and past Workflow Executions. You can use it to see the timeline of each execution as well as the input parameters and return values of the Workflow and all of its Activities. The Web UI will even help you to identify problems in your application at runtime so that you can resolve them more quickly.
Visit the Temporal Web UI, where you will see your Workflow Execution listed.
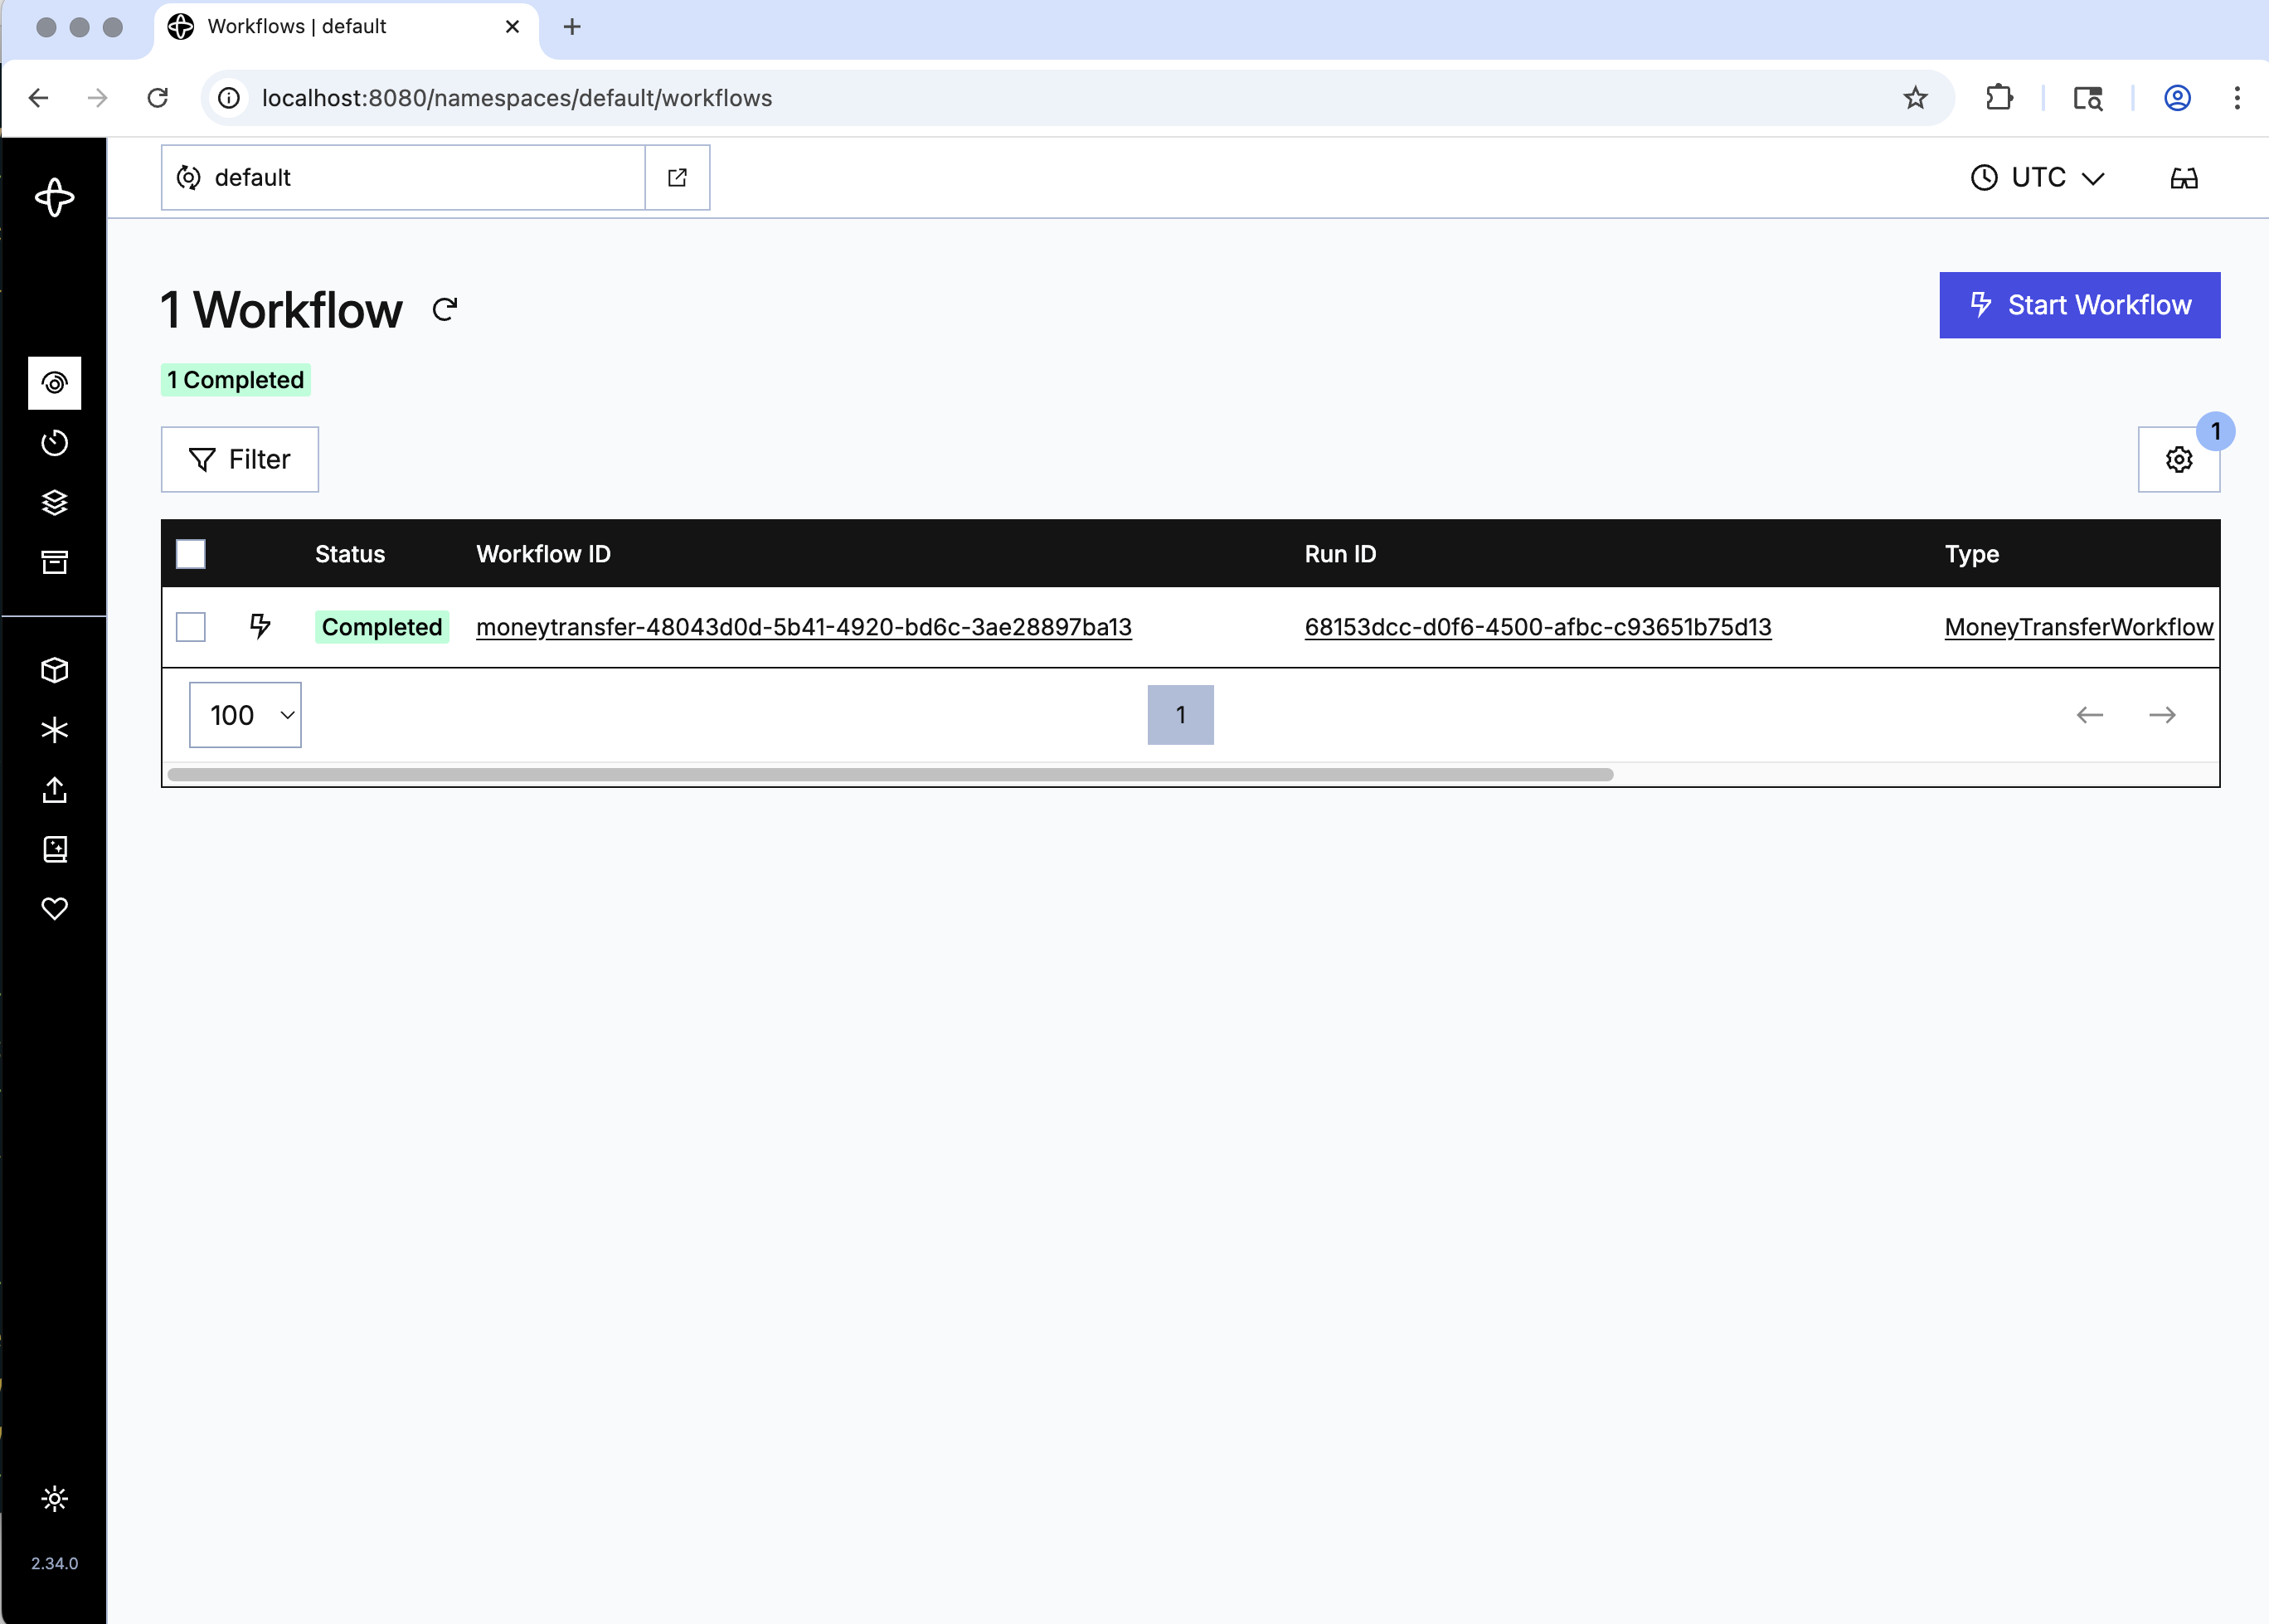
Click the Workflow ID for your Workflow Execution. This will show you the detail page, which shows you much more information.
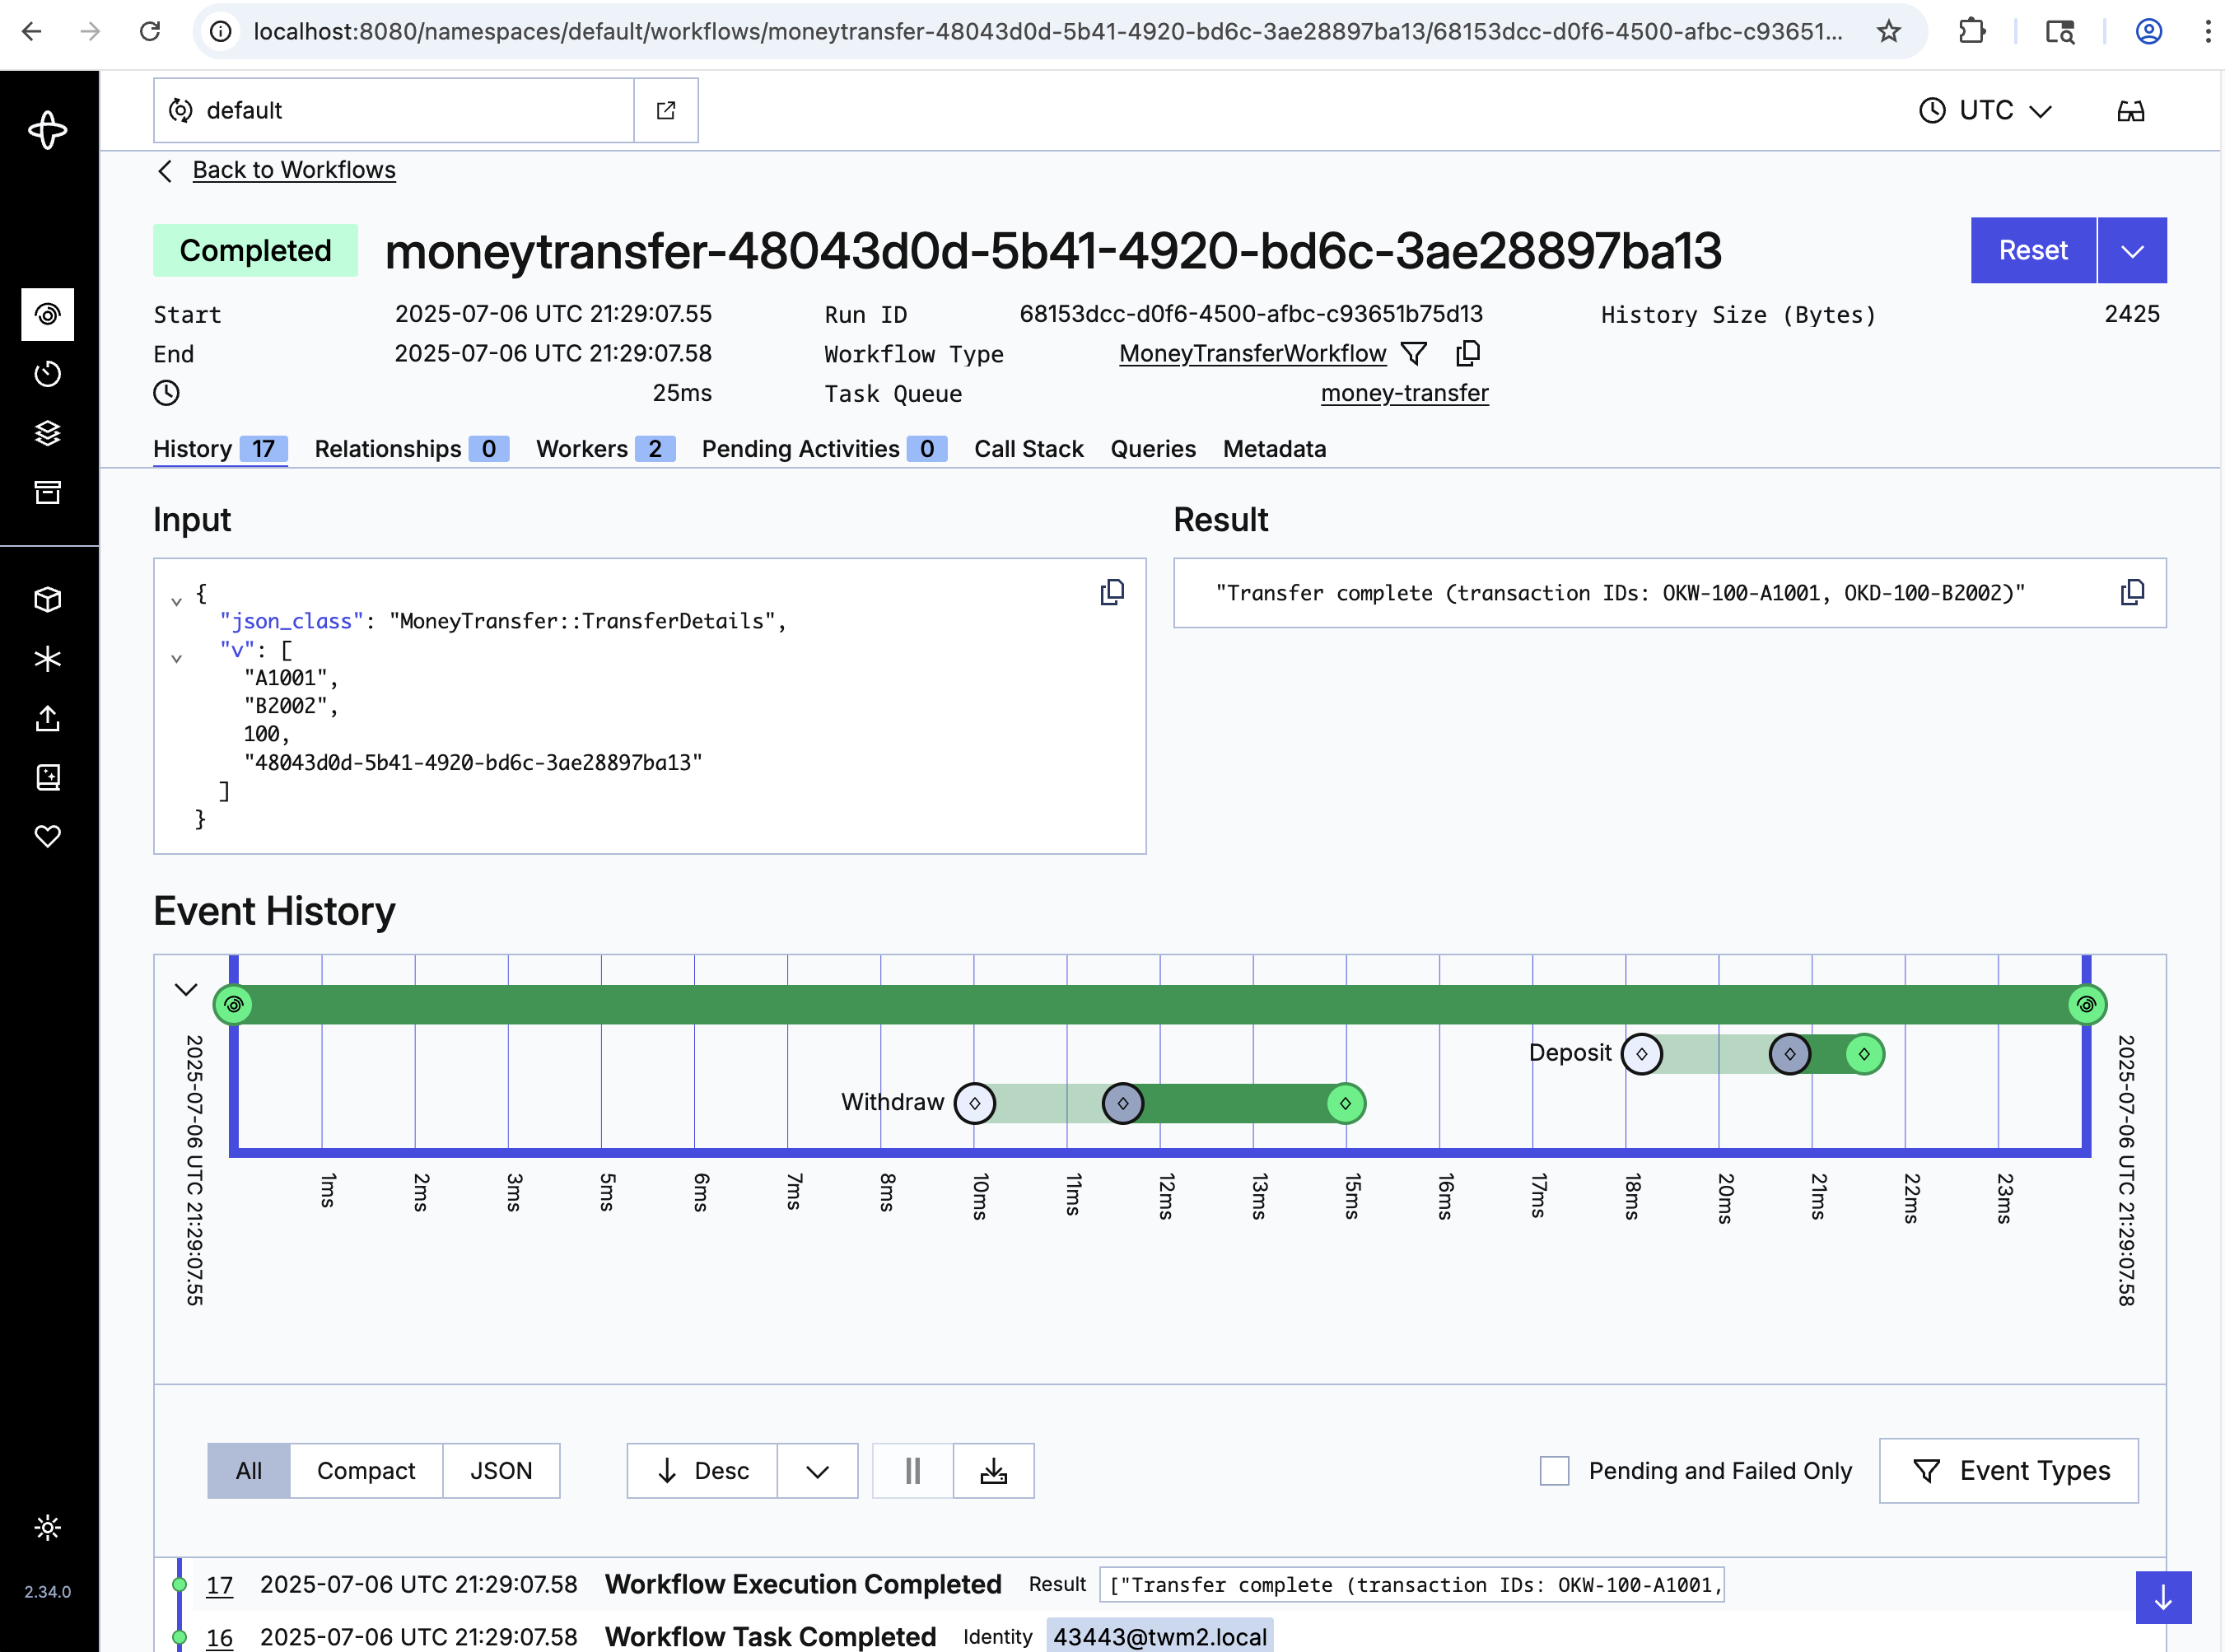
The top section shows the status (completed), Workflow ID, timestamps for the start and end time, Task Queue name, and other details.
The Input and Result sections below show the input data supplied to the Workflow Execution and the value that it returned upon completion.
The Event History section begins with a graphical timeline view, depicting the points at which each Activity started and finished within the Workflow Execution. Below that is a table with a detailed history of every event that took place during the execution, which includes the inputs and result for each Activity.
 Simulate failures
Despite your best efforts, there will be times when something goes wrong in your application. It might encounter a network glitch, a server might go offline, or there might be a bug that causes it to crash. One of Temporal's most important features is its ability to maintain the Workflow Execution's state when something fails. To observe this, you will simulate some failures to see how the application responds.
Recover from a server crash
Unlike many modern applications that require complex leader election processes and external databases to handle failure, Temporal automatically preserves the state of your Workflow even if the server is down. You can test this by stopping the Temporal Service while a Workflow Execution is in progress.
Try it out by following these steps:
- Press
Ctrl+Cin the terminal where your Worker is running. This will kill it, ensuring that a Workflow Execution cannot finish. - Switch back to the terminal where your Workflow ran. Start a new Workflow
Execution by running
bundle exec ruby starter.rbagain. - Return to the main page in the Temporal Web UI and verify the new Workflow Execution has a status of "Running"
- Switch to the terminal where you started the Temporal Service and press
Ctrl+Cto stop the service. - After the Temporal Service has stopped, run the previous command
(
temporal server start-dev --db-filename temporal.db --ui-port 8080) to restart it, ensuring that it uses the same database file as before.
No data is lost when the Temporal Service went offline. When it came back online, the work picked up where it left off before the outage. Keep in mind that this example uses a single instance of the service running on a single machine. In a production deployment, the Temporal Service can be deployed as a cluster, spread across several machines for higher availability and increased throughput.
Visit the Web UI. You should find that the Workflow Execution you started in step 2 is still listed. However, when you view its detail page, you'll see a message informing you that no Workers are currently polling the Task Queue that it uses.
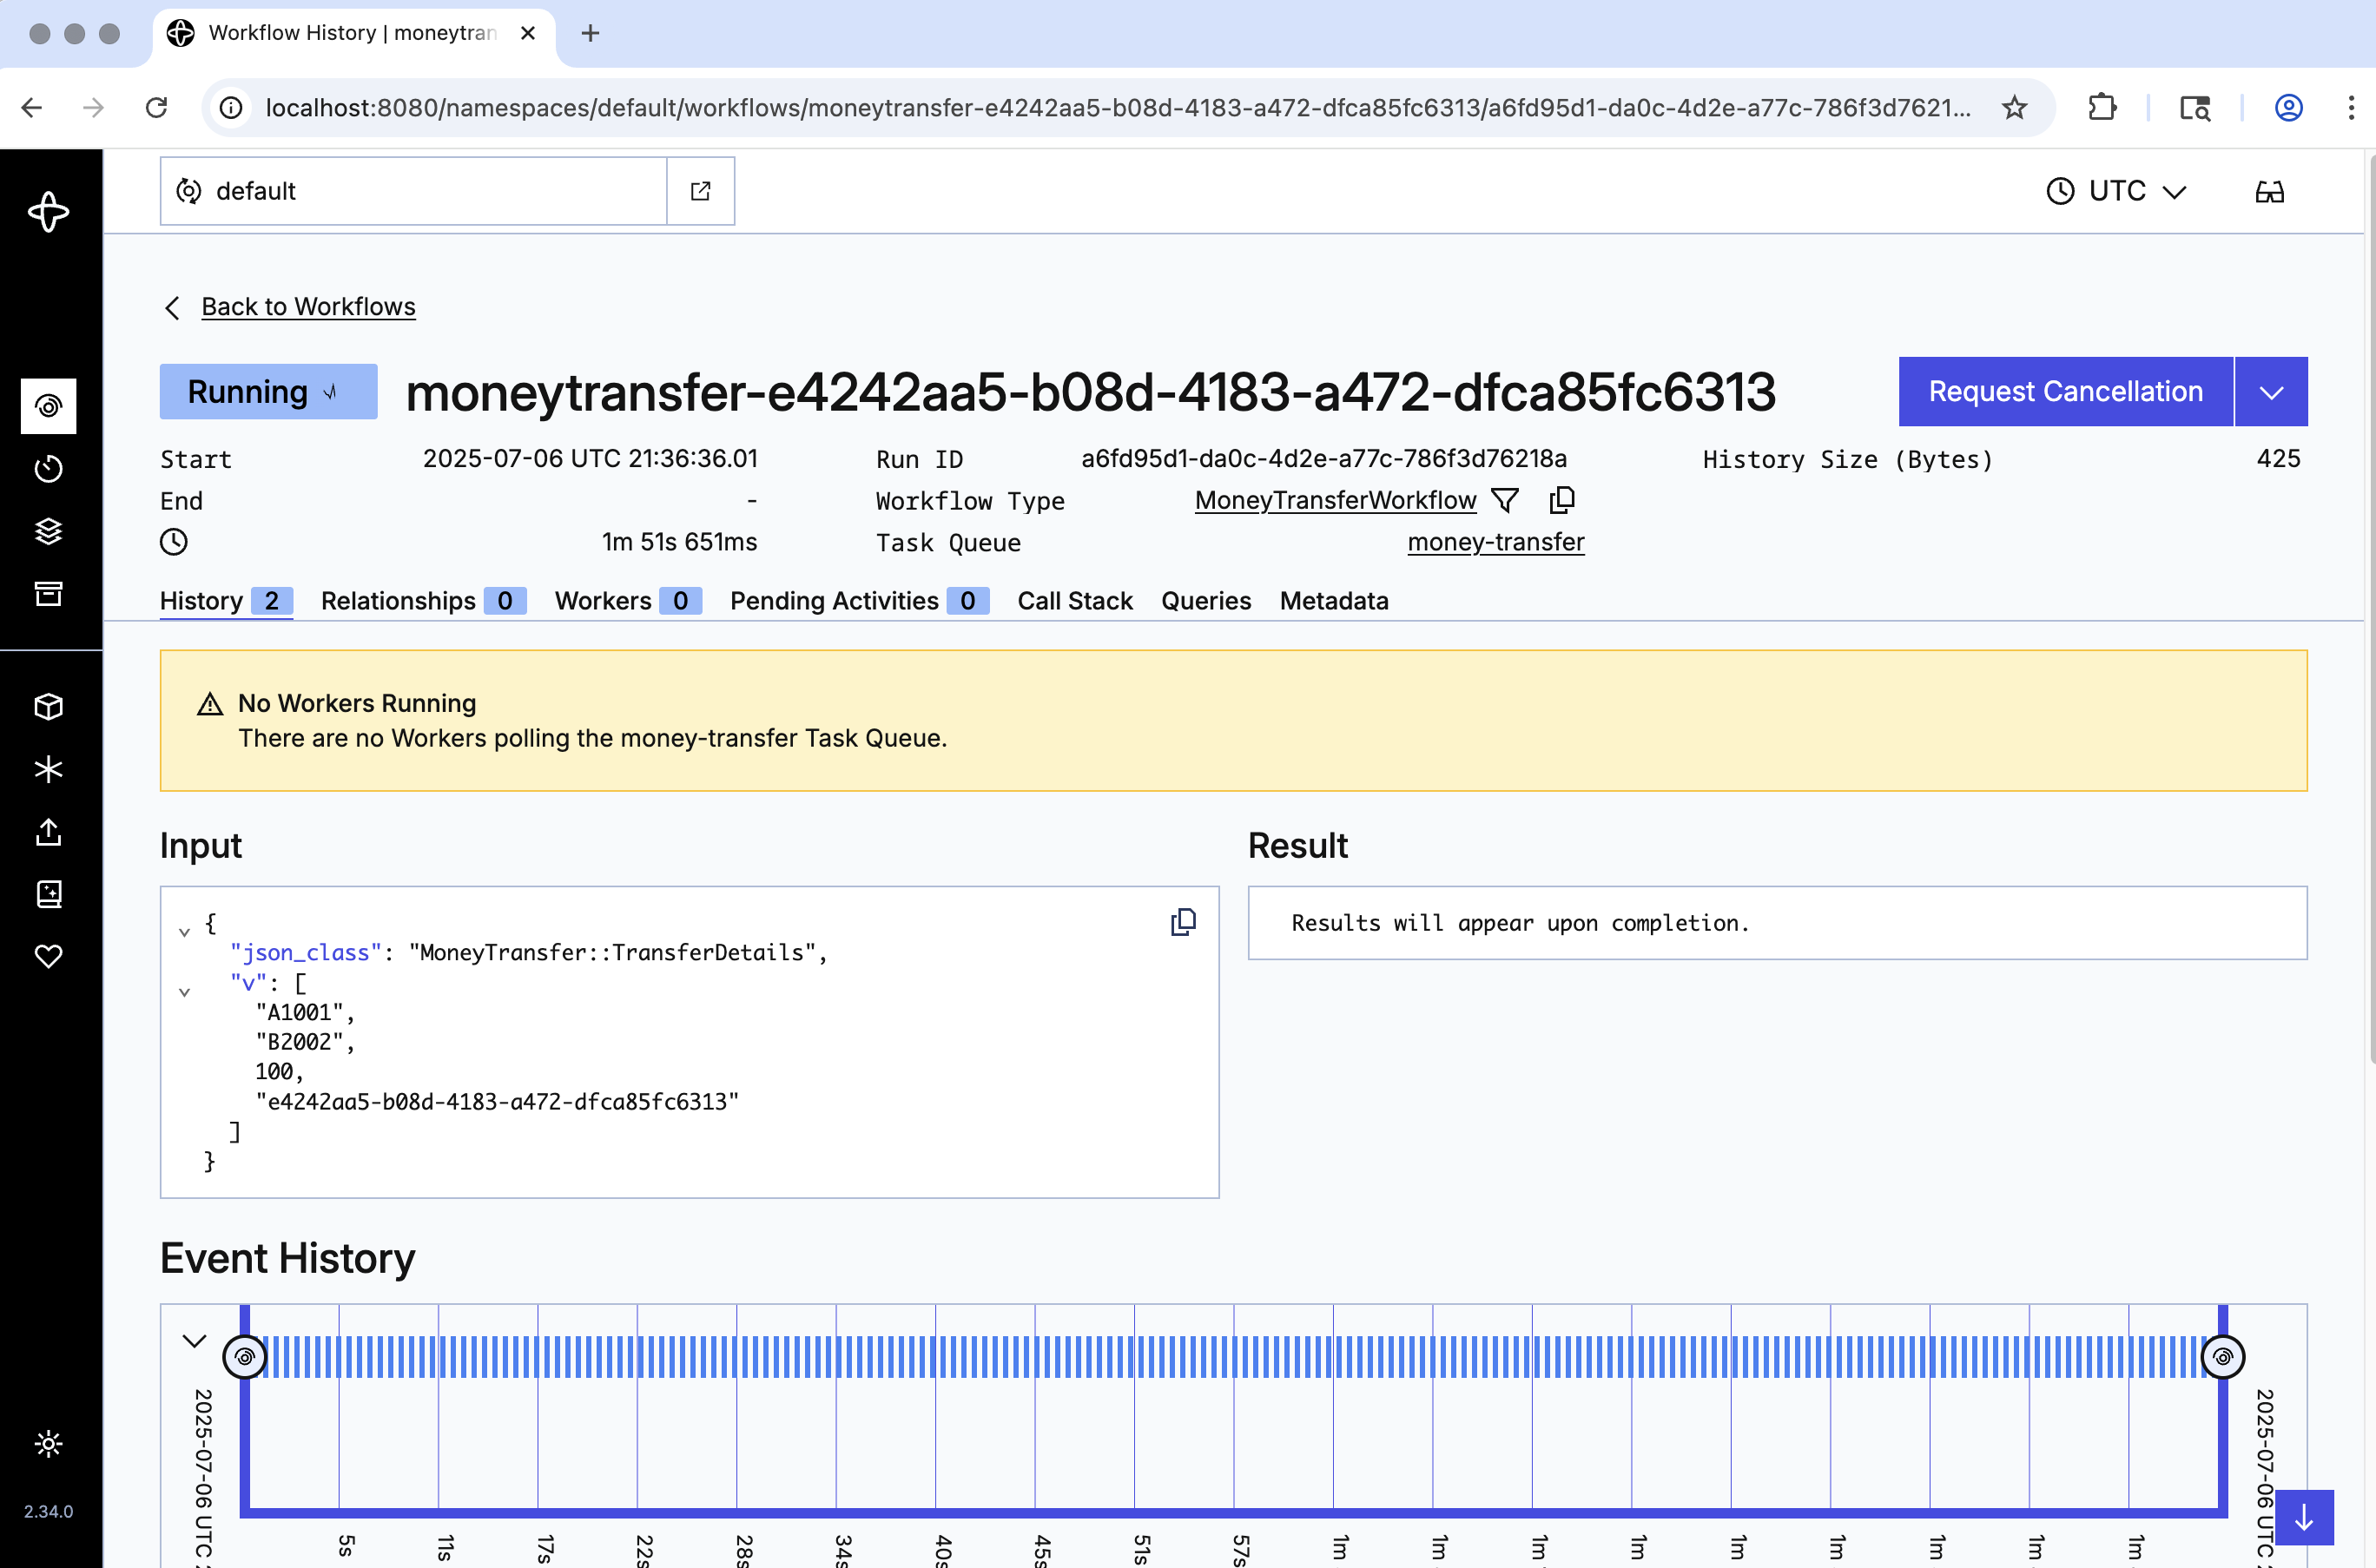
Although a Workflow Execution can not progress if no Workers are running, it remains open. When a Worker becomes available, execution will continue automatically. In production, it's common to run multiple Workers at once. In this case, if a Worker happens to crash, other Workers automatically take over any work that was already underway.
Now, switch to the terminal where your Worker was running and run the previous
command (bundle exec ruby worker.rb) to start the Worker. When you refresh
the Web UI, you should find that the status of the Workflow Execution changed
from "Running" to "Completed."
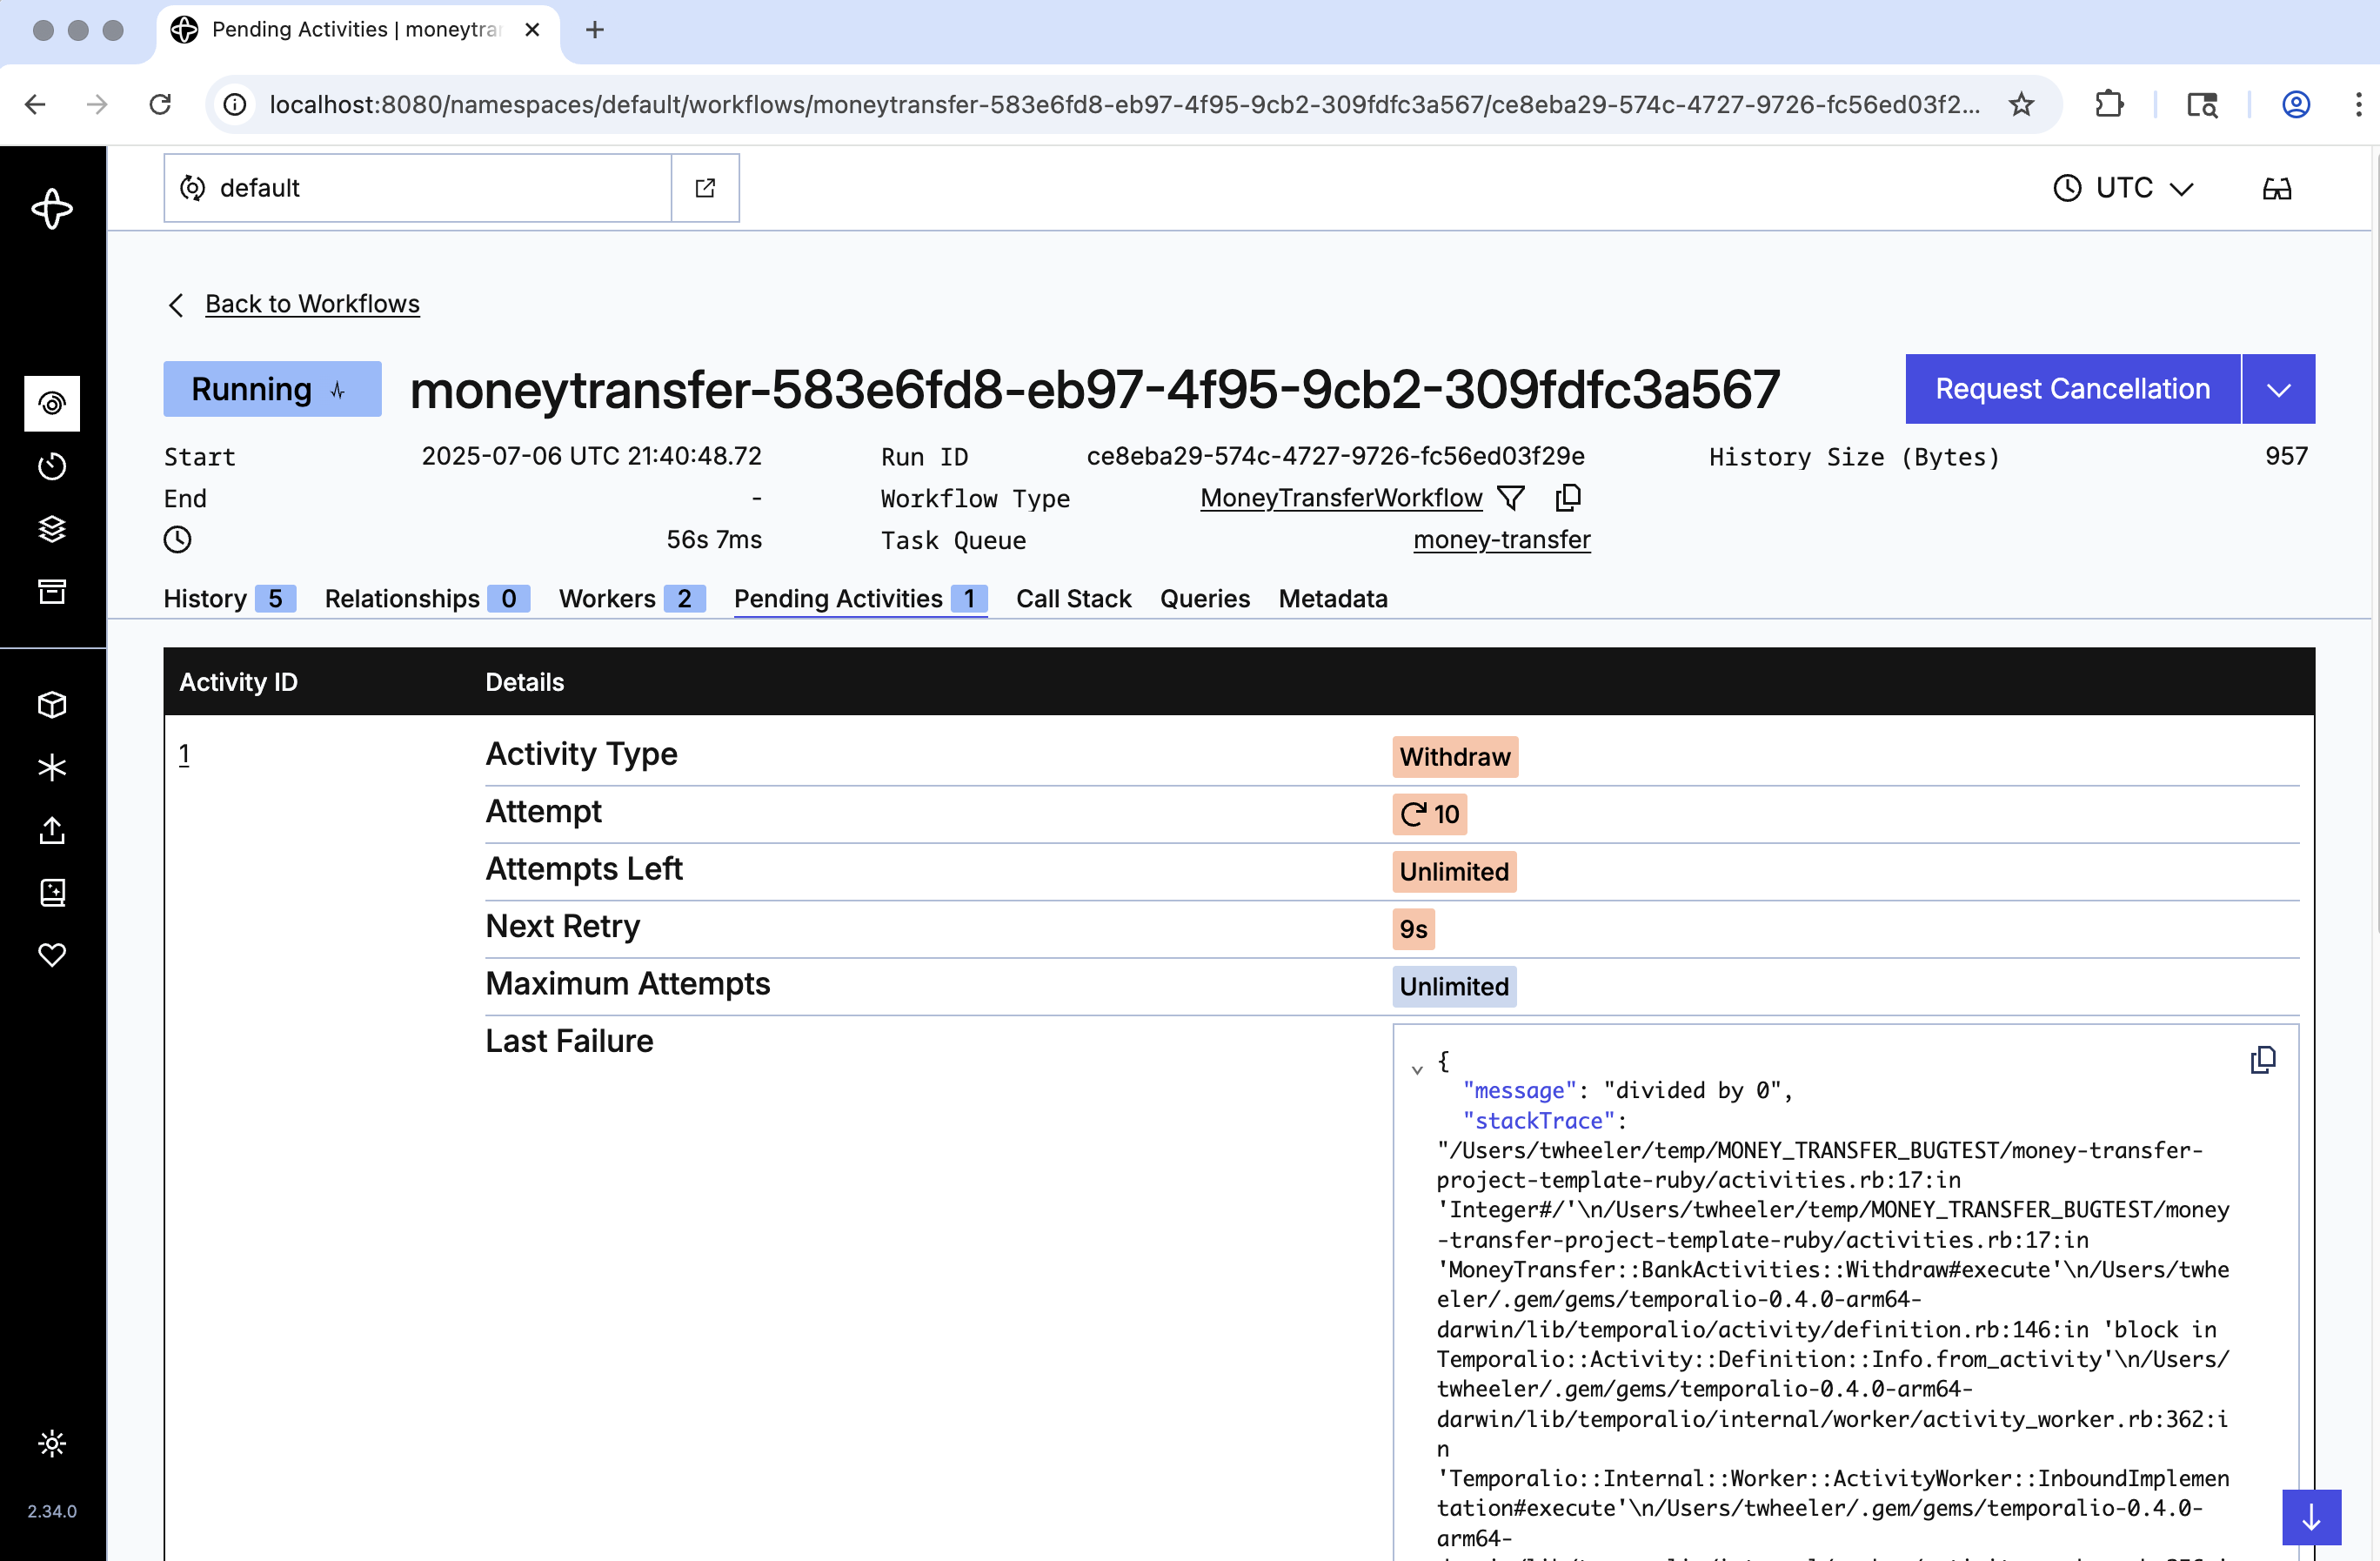
Recover from an unknown error in an Activity
The Withdraw Activity contains a bug, although it hasn't been a problem yet
because that statement is currently commented out. You will now uncomment it
to expose the bug. You'll see that this causes the Activity to fail, but you'll
also see that it retries automatically. More importantly, you'll observe that
after you fix the bug, the Workflow Execution that was failing will complete
successfully.
By the way, the timeline view in the Web UI will show you that the Activity
is failing. In the screenshot below, the red line near the bottom indicates
that the Withdraw Activity has failed and is being retried.

The Pending Activities tab (above the Input section) is labeled with a 1, which indicates that there is currently one failing Activity. That tab shows additional information about the failure, including the cause of the error and a stack trace that identifies the specific line of code that is failing.
Try it out by following these steps:
- Whenever you modify the code, you must restart the Worker for the changes to
take effect. Press
Ctrl+Cin the terminal where your Worker is running to stop the Worker so that you can introduce the bug in the next step. - Edit the
activities.rbfile, uncomment the line in theWithdrawActivity that causes a divide-by-zero error, and save the change - Start the Worker again by running
bundle exec ruby worker.rb - Start a new Workflow Execution by running
bundle exec ruby starter.rb - Go to the main page in the Temporal Web UI and click the Workflow Execution you just started to view its detail page. You should see that the Withdraw Activity is failing. Click the Pending Activities tab to see the cause, and then click the History tab to return to the previous view.
- Edit the
activities.rbfile, comment out the line with the divide-by-zero error, and then save the change. - Press
Ctrl+Cin the terminal where your Worker is running and then runbundle exec ruby worker.rbto start it again. The Worker will now use the code that contains the change you made in the previous step.
You should see that the Workflow Execution completes successfully. This will be visible both in the Web UI and in the terminal where you started the Workflow Execution.
Conclusion
You now know how to run a Temporal Workflow and understand some of the value that Temporal offers. You explored Workflows and Activities, you started a Workflow Execution, and you ran a Worker to handle that execution. You also saw how Temporal recovers from failures and how it retries Activities.
Further exploration
Try the following things before moving on to learn more about Temporal applications in Ruby.
The starter.rb file used in this example has built-in values for the source
account, target account, amount, and reference ID. However, it's designed so
that you can override those through positional command-line arguments. You'll
use some specific values to trigger special cases that are built into this
application.
Trigger a compensating transaction
The user who had account B5555 closed their account. Attempting to deposit
there fails because the Deposit Activity raises an InvalidAccountError.
Normally, failures in an Activity will be automatically tried, but this type
of error has been designated as non-retryable in the Workflow's Retry Policy.
As mentioned above, the money transfer Workflow is designed to handle this
situation by refunding the money to the source account. To see this in action,
run the command below to transfer $100 from account A1234 to B5555:
bundle exec ruby starter.rb A1234 B5555 100
Afterwards, go to the main page in the Temporal Web UI
and click the Workflow Execution you just started to view its detail page. The
timeline view should show you that the withdrawal succeeded, the deposit failed,
and it was able to recover by running the Refund Activity.
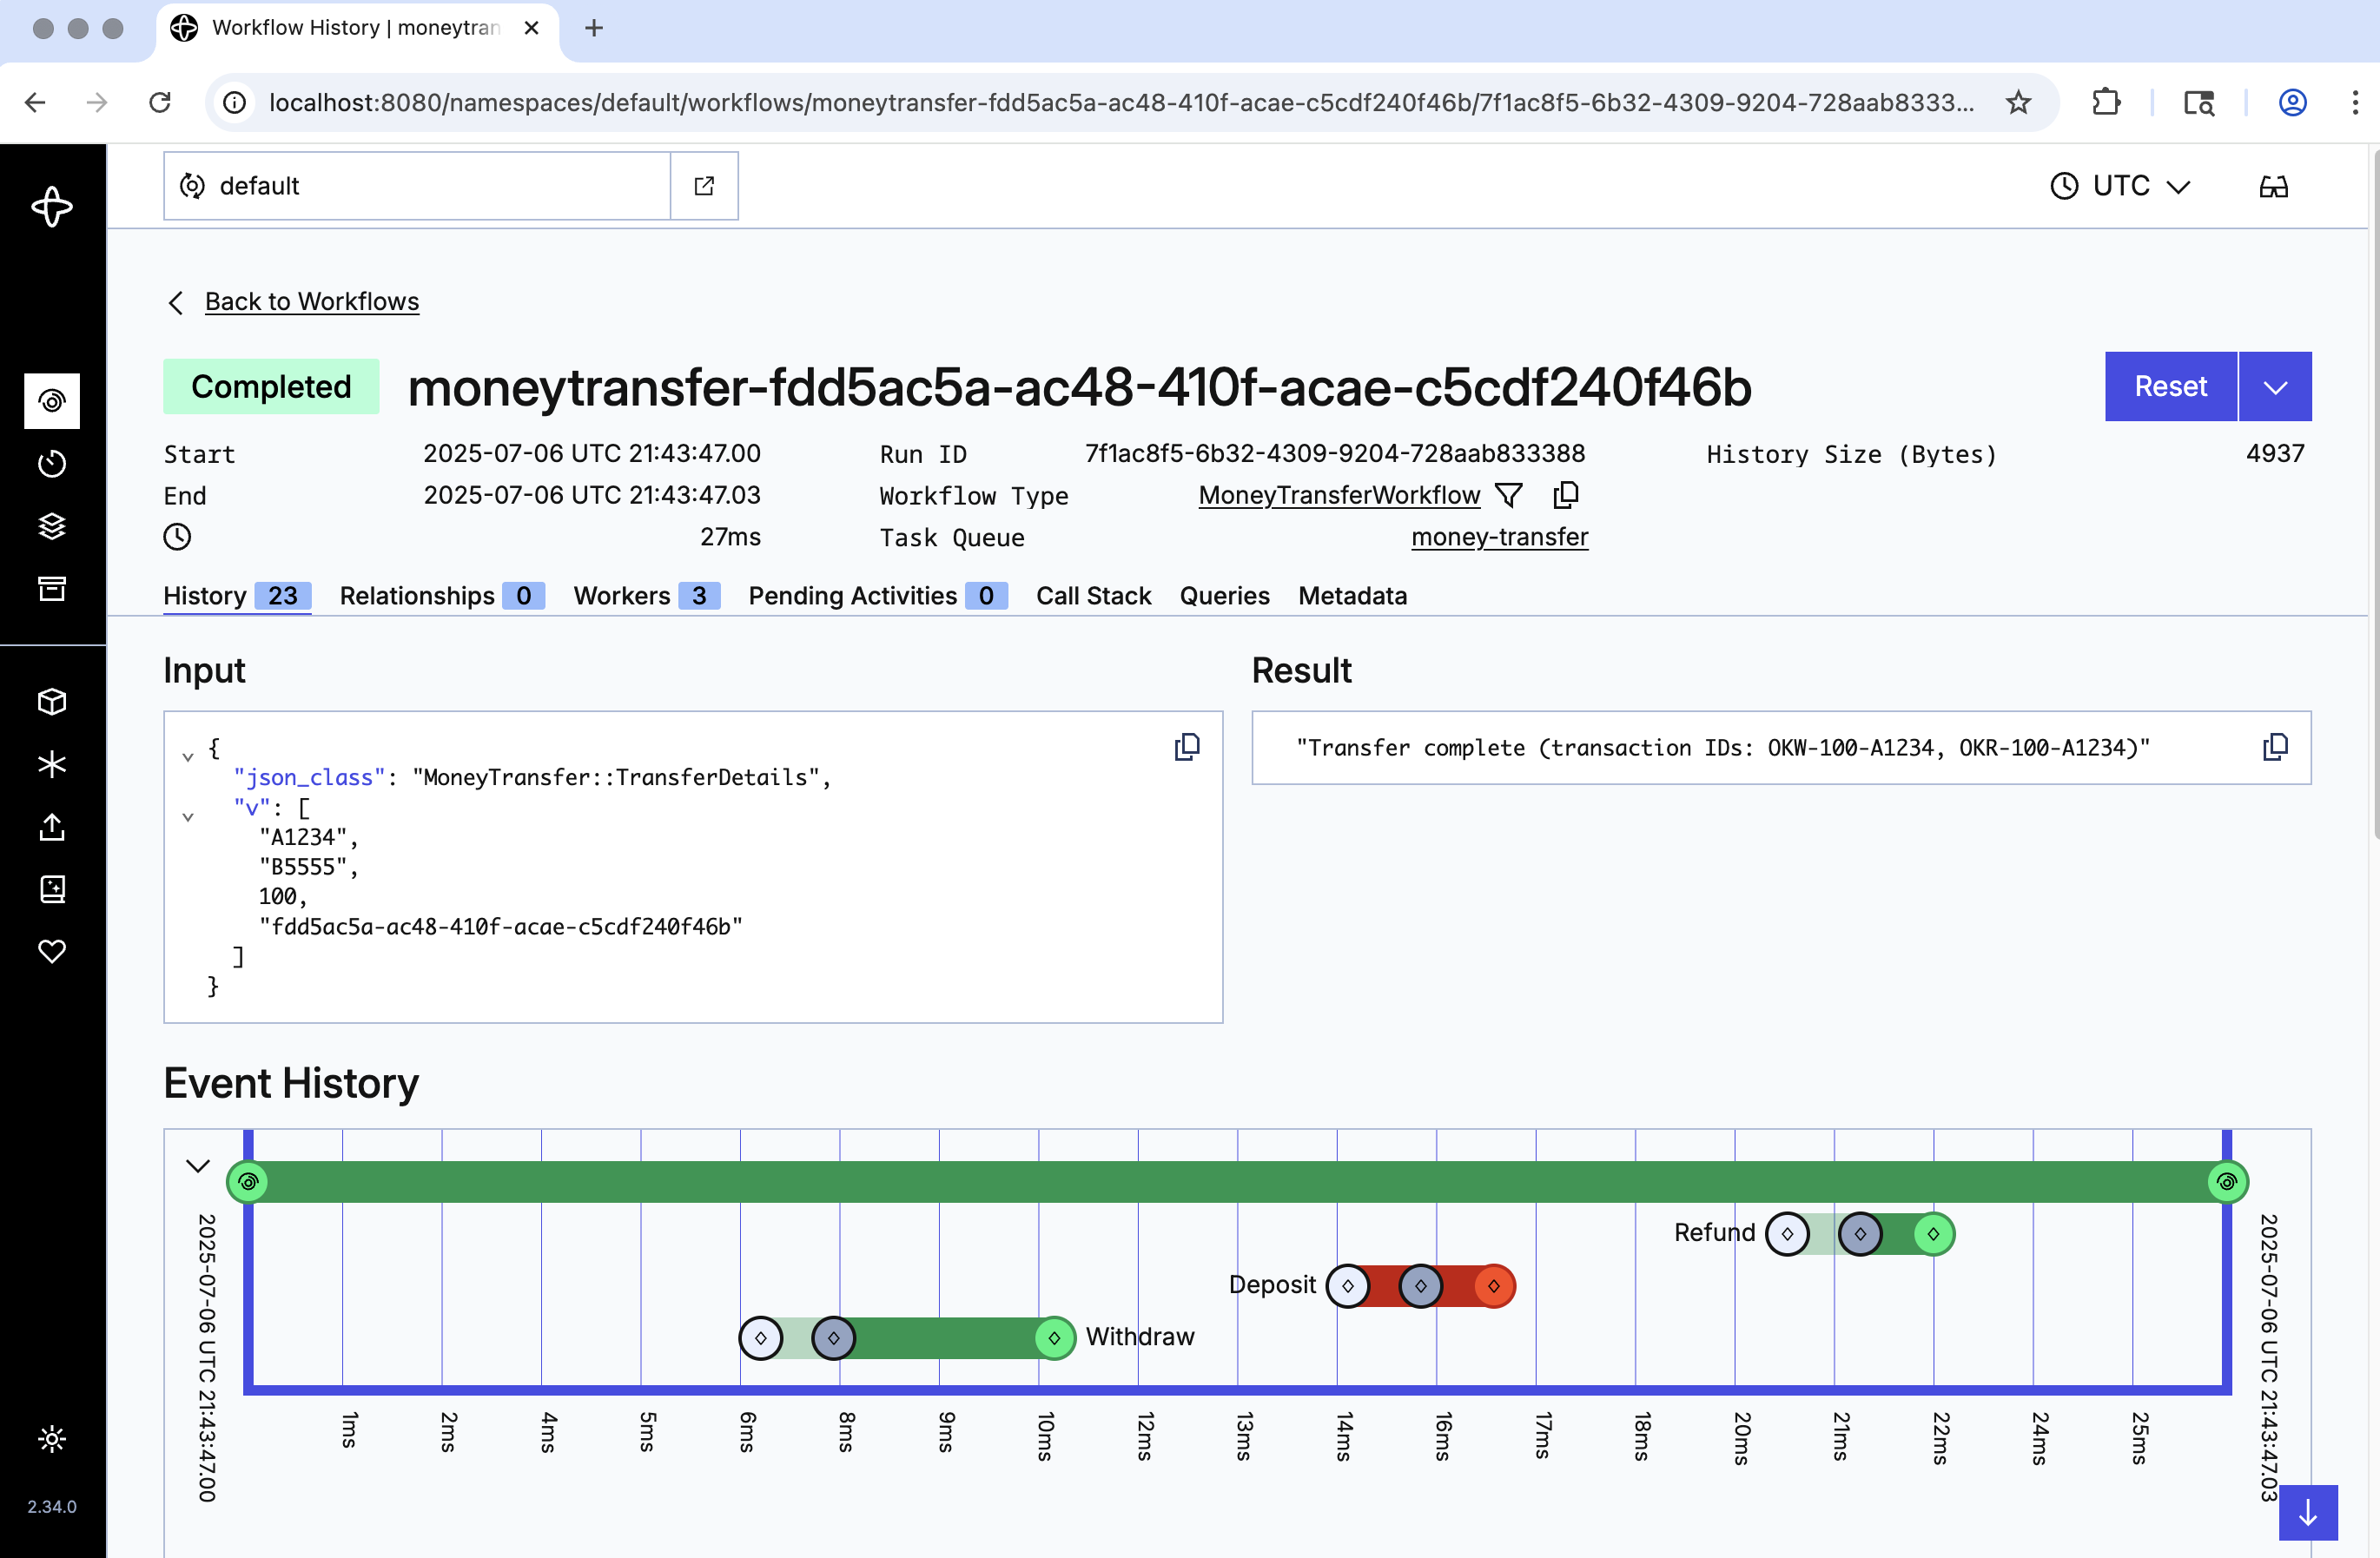
Review the workflow.rb file to see how to implement this logic.
You should also note that despite the earlier failure, this Workflow Execution ends with a "completed" status, which equates to success. Although that might seem surprising at first, it's typical in Temporal. You should view it as an indication that the Workflow completed the final step, which does not preclude it from encountering (and overcoming) one or more problems along the way.
Trigger a non-retryable error that fails the Workflow Execution
If the transfer amount exceeds $1000, withdrawal will fail due to insufficient
funds. As per the custom Retry Policy in workflow.rb, this type of error is
also defined as non-retryable. Unlike the InvalidAccountError mentioned above,
however, the Workflow provides no special handling in this situation. Therefore,
when the Activity fails, it won't be retried, and the Workflow Execution will
immediately fail.
To see this in action, run the command below to transfer $5000 from account
A1234 to B5678:
bundle exec ruby starter.rb A1234 B5678 5000
Review
Answer the following questions to see if you remember some of the more important concepts from this tutorial:
What are four of Temporal's value propositions that you learned about in this tutorial?
- Temporal automatically maintains the state of your Workflow, despite crashes or even outages of the Temporal Service itself.
- Temporal's built-in support for retries and timeouts enables your code to overcome transient and intermittent failures.
- Temporal provides full visibility in the state of the Workflow Execution and its Web UI offers a convenient way to see the details of both current and past executions.
- Temporal makes it possible to fix a bug in a Workflow Execution that you've already started. After updating the code and restarting the Worker, the failing Activity is retried using the code containing the bug fix, completes successfully, and execution continues with what comes next.
Why do we recommend defining a shared constant to store the Task Queue name?
Because the Task Queue name is specified in two different parts of the code (the first starts the Workflow and the second configures the Worker). If their values differ, the Worker and Temporal Service would not share the same Task Queue, and the Workflow Execution would not progress.
What do you have to do if you make changes to Activity code for a
Workflow that is running?
Restart the Worker.